|
Text prepared by Karl Schuon
Photographs by Louis Lowery
Foreword
A sudden realization of the thorough preparation for combat which
will become an integral part of a Marine recruit's life strikes
grimly home when he arrives at Parris Island and reads its motto
- "Let's be damned sure that no boy's ghost will ever say,
'If your training program had only done its job.'"
But that training program doesn't end with boot camp nor does it
end as long as the man is a Marine. Training develops specialists,
and every Marine is a fighting specialist, equipped with the knowledge
necessary to qualify him for his important role on one of the world's
deadliest teams. Wherever he may be, he is kept abreast of the warfare
times, taught the battle techniques of tomorrow, and given confidence
in his own proficiency - the proficiency of his Corps.
He is part of a team, trained to do his job in a coldly calculated
war of scientific weapons and mass destruction. But the touted push
button warfare has limitations, and they demand the individual's
ability to meet his enemy face to face, steel to steel, hand-to-hand.
Whether he is a radar operator, a communications man or a truck
driver, he must be prepared to defend his own life in any eventuality.
Close combat has been skillfully developed into a science of self-preservation
- and the advance of death-dealing devices does not preclude the
necessity for a basic knowledge of hand to hand principles and confidence
in their application.
A Warning Word...
The publishers of Co/d Steel wish to express their concern regarding
the possible dangers involved in releasing a book of this type.
It must be clearly understood that the principles prescribed on
the following pages are intended to teach the fighting man to kill.
Every precaution must be exercised in the practice of these principles;
a slip in a careless attempt to perform movements described in this
book may result in serious damage or the death of an innocent training
partner. Care should be taken to prevent the book from falling into
the hands of children who may thoughtlessly try some of these principles
on their playmates. Cold Steel is a recipe for death; use it wisely!
PUBLISHER
Preface
But as brutality begets cruelty, so apology begets explanation.
And, since America is not a brutal nation, the words between these
covers are vulnerable to condemnation.
But an honest purpose cannot be damned. As long as other nations
war against each other in lust, greed and ambition, brutality will
persist and the brutal words on these pages will have a purpose.
When an atom bomb is loosed on a city, killing several hundred thousand
people, the magnitude of suffering and death is incomprehensible
to the average person and conjures up a picture of horror rather
than brutality. If, however, the plane which dropped the bomb is
forced down on enemy territory on the return flight, and the crew
is faced with a hand-to-hand grapple with an enemy patrol where
a hand throttling a throat, a knee smashing into a groin or a finger
gouging an eye may mean life or death, then brutality becomes a
reality.
The realness of brutality must be faced with the same direct approach
in which we build an air raid shelter. World War II taught Americans
the vast scope of atrocity; it would be criminal negligence to close
our eyes to the bloody mayhem American military men will meet in
the field. They must be taught to meet it with a basic knowledge
of its principles, the practical application of those principles,
and confidence in themselves to wage identical war.
To Americans, who fight fair and clean by heritage - when they can
- we dedicate this book...
That they may save their own lives by confidently engaging their
enemy with his own unprincipled principles.
Acknowledgments
The author is indebted to many people and organizations who were
instrumental in broadening his knowledge and perspective of close
combat technique. Grateful recognition is hereby accorded to those
who have made this contribution.
The United States Marine Corps
The late Col. A. J. Drexel Biddle, USMCR
Col. William A. Kengla, USMC;
Lt. Col. Walter R. Walsh, USMCR
Lt. Col. William E. Daly, Infantry, N. Y. Guard
George Santelli, Coach, American Olympic Fencing Team
Edward Lucia, 1st Assistant to Santelli
Sam Munson, Master of Arms, Sala Messineo
Carl Kitt, U.S. Naval Academy
Stephen V. Grancsay, The Metropolitan Museum of Art
Herbert Kreiger, Smithsonian Institute
Sylvester Vigilante, N. Y. Public Library
Robert Scott, Authority on James Bowie
General Leroy P. Hunt, USMC (Ret.)
Maj. General Ray A. Robinson, USMC
Mendel Peterson, Curator of Military and Naval History, Smithsonian
Institute
And the many other individuals and organizations who have given
generous cooperation and assistance.
Contents
Knife Fighting
Unarmed Combat
The Stick
Knife Throwing
The Bayonet
For 300 years the use of the bayonet has remained the same; fundamentally
it is a pike - its object:
To stick your opponent before he sticks you!
Let's face an opponent. Let's recognize the fact that he understands
the use of his weapon, but let's not accept the supposition that
the contest is going to be even. It doesn't have to be; you can
have the advantage.
An aggressive opponent will thrust his bayonet at you, attempting
to direct its point to the vital areas of your body - the chest
or throat. This statement is ridiculously obvious, but it can be
the basic action which will decide which one of you lives to engage
another enemy. The correct application of the weapon in your hand
will give you immediate command of the situation.
Merely knock your opponent's weapon aside and kill him!
Simply said. Simply done.
No fancy footwork; no intricate fencing, just two simple, natural
movements combined with speed and accuracy.
The bayonet fighters of the old school will probably stop reading
at this point and throw up their gnarled hands in rage, or shake
their greying heads in pity, cynicism or wonder.
"Footwork and fencing," they will insist, "are the
foundations on which bayonet fighting is built!"
No one will discount the value of these two fine aspects of bayonet
technique, but their value was based on the one great doubt which
has always haunted bayonet wielders:
"On which side of my blade will my opponent's blade fall? My
correct parry depends upon where his blade falls."
True.
But this doubt can be eliminated by furnishing your opponent with
ONLY ONE TARGET. The position in which you hold your piece will
determine the direction of his weapon; you know where it will be;
when it comes within your range, one deft move of your body will
remove instantly the target he thought he had. In its place he will
find your blade, pointed directly at his throat-his own weapon sawing
the thin air.
YOUR thrust ends the engagement.
THE GUARD POSITION
The text and photographs in this book are intended for RIGHT-HANDED
persons. Individuals who are LEFT-HANDED will simply REVERSE the
directions given.
The Body
In learning to assume the guard position, the following steps will
prove helpful:
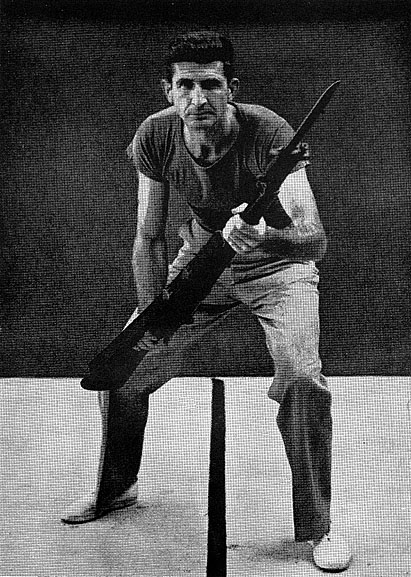
1. Stand at attention at port arms.
2. Turn the piece AWAY from you, placing the blade OUTBOARD.
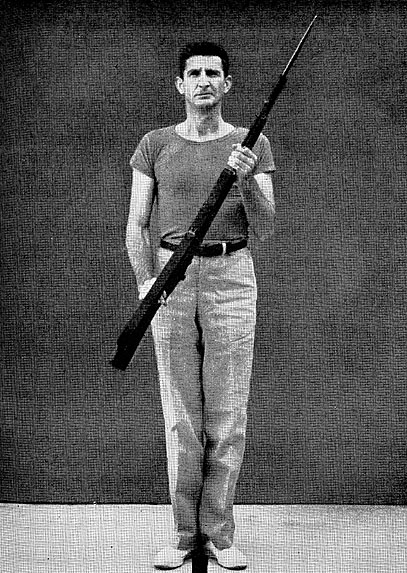
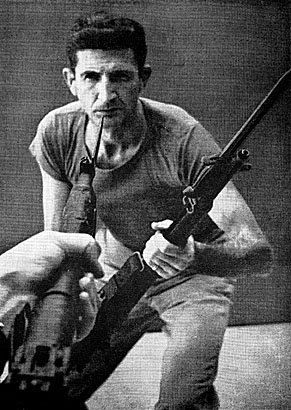
The proper hold on the piece at port arms. The blade faces outboard.
This is the first step in learning the guard position
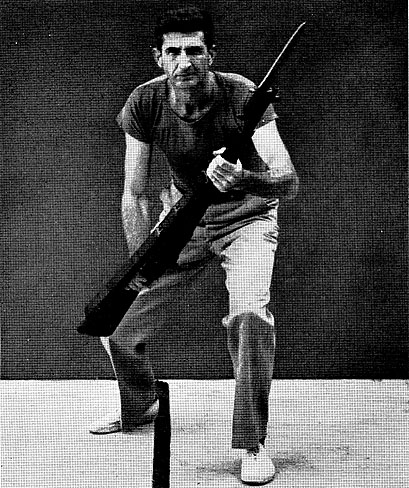
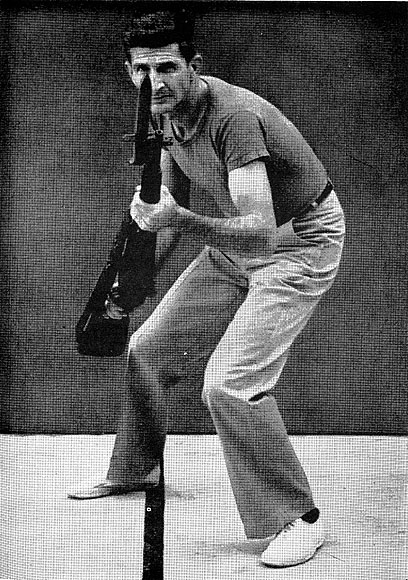
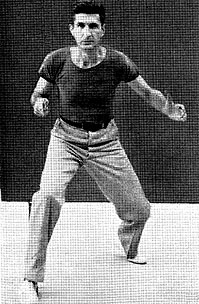
From port arms drop into a guard position. The body should be well
balanced in a crouch with the feet placed diagonally
3. Release your left hand from the proper port arms hold
and regrasp the piece on the upper hand guard, immediately
above the upper sling swivel.
4. Now, WITHOUT MOVING THE POSITION OF THE ARMS, assume the boxer's
crouch, high or low as the occasion may demand. Remember that the
point should be to the left, but on a level with your opponent's
eyes.
The Blade
The edge of the blade must be kept on line with the forearm, In
this position the cutting edge will be ready for use with no loss
of time or effort. In addition, your blade will have greater strength
when striking your opponent's piece, if the blow is made with the
blade held vertical to the striking surface, rather than in a flat
position. It means the difference between one vertical inch of steel
and one quarter of an inch if the blade strikes with its flat surface.
The Hands
The left hand grasps the upper hand guard and remains
there except when it is released to execute the "Throw
Point".
The fingers of the right hand are securely wrapped around
the small of the stock.
The Feet
The body is well-balanced - feet apart at an angle, left foot in
front of the right.
The Piece
The piece is held at an angle exposing the upper torso on the right
of the blade.
All formidable attacks can be made from the guard position. You
can walk or run with this guard just as you would with your rifle
held at port. With a mere movement of your body you can drop instantly
into guard and engage an enemy. Briefly, in this position, you are
always "ON GUARD".
THE BEAT THRUST
This simple movement is the meat of all your attacks. The moment
your opponent's blade comes within your range, close the gap and
at the same time, with the full weight of your body, beat his blade
with a severe rap, and immediately thrust home.
The point of your blade will drop slightly with the motion, coming
into line with your opponent's upper chest or throat. There will
be a tendency, at first, to overshoot your beat; this means that
your point will have gone too far over to line up on your opponent's
throat. This lack of control is to be expected at first, simply
because you will be overly anxious to assure yourself that his blade
is absolutely knocked aside. If this happens, it will mean that
you will have to recover by whipping your blade back, cutting the
side of your opponent's head or neck. If possible, whip the blade
back into line with your opponent's throat or chest - and thrust.
Recovery of your blade back into line for a thrust depends upon
the agility of your opponent; if he is too slow to take advantage
of your overshot beat with a Butt Stroke, you will have time to
line up your blade. "Time", in this instance, refers to
fractions of seconds, and what you do with eight-tenths of a second
may mean the difference between a Stateside liberty and a clipped
dog tag.
The Beat
It is NOT difficult to beat your enemy's blade aside before thrusting.
Here's proof:
Select the strongest man available; give him a rifle and scabbarded
bayonet; have him assume the usual guard position.
Now take your index finger and attempt to move his blade. YOU WILL
BE ABLE TO MOVE HIM IN A COMPLETE CIRCLE! If you can do this with
your finger you can most certainly do it with your blade!
Attack Your Opponent's Blade
The length of your enemy's weapon is unimportant. Actually, the
longer your opponent's weapon is, the easier it will be for you
to beat it aside - YOU ATTACK HIS BLADE!
The Carbine?
If you are carrying a short carbine it will protect your vital
chest and throat areas if you use the prescribed guard. It is equally
as effective as a larger weapon.
Pivot your body and beat. When executing this movement you will
be wheeling the blade's point into line with the opponent
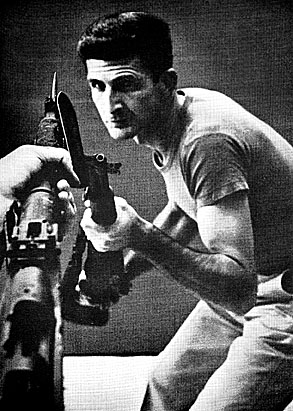
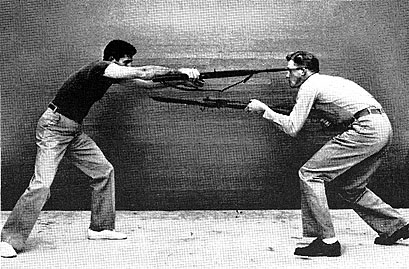
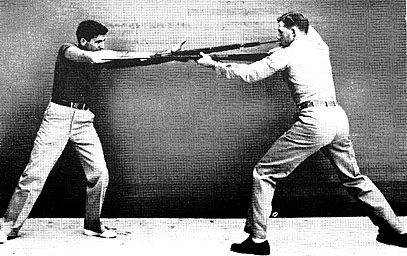
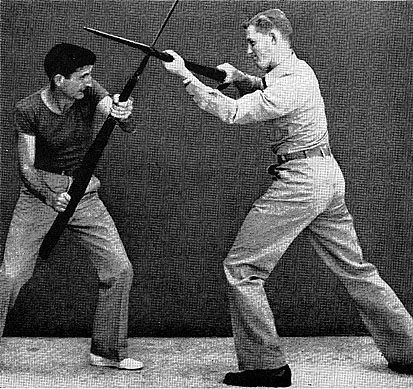
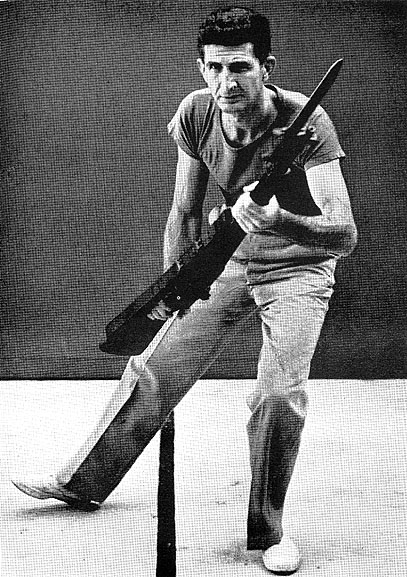
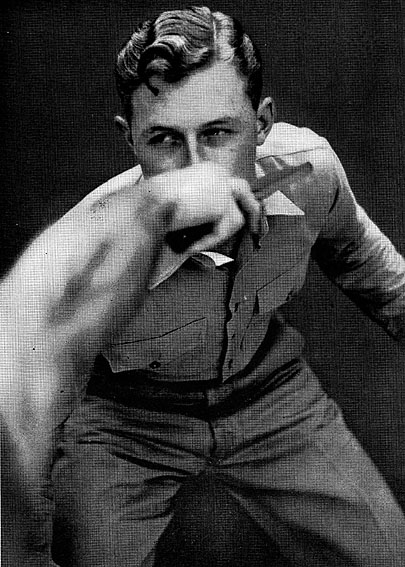
The guard position before the beat. Your opponent has only one tarqet;
he is forced to attack on the right of your blade
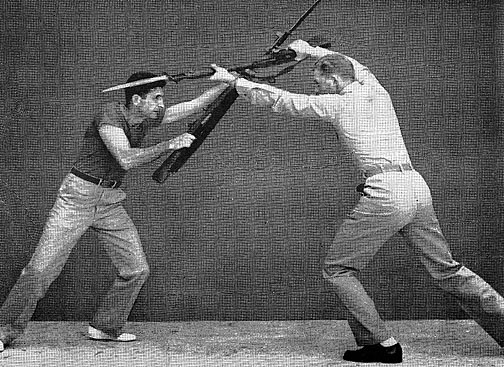
The beat. Your blade should be in a vertical position when it strikes
the opponent's weapon. Follow immediately with thrust

The side view of the beat from the guard position. The blade is
held broadside for strength when striking enemy's weapon
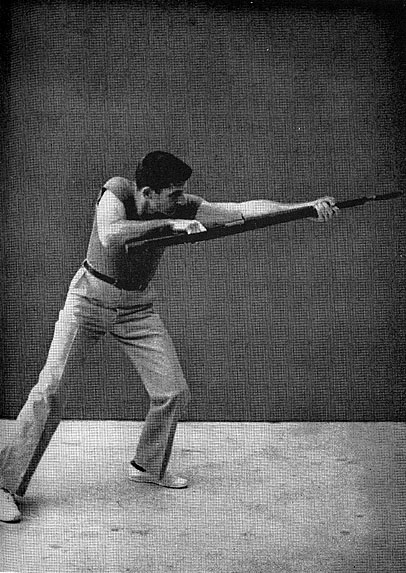
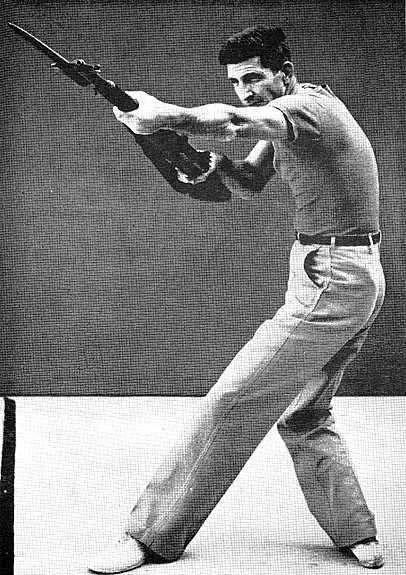
The thrust. Your left arm is extended fully as your weapon travels
forward in a fast, powerful drive, directly to a target
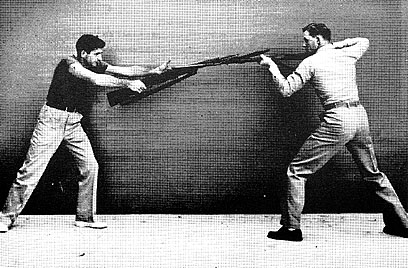
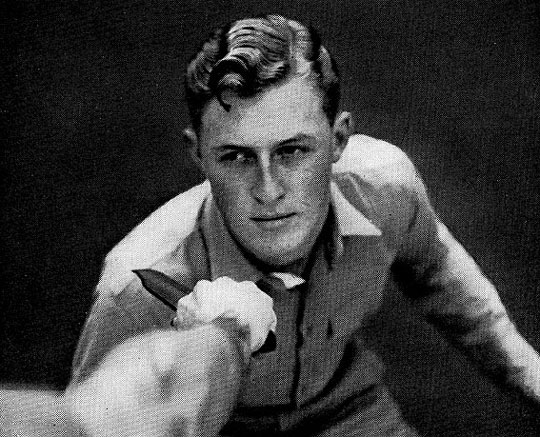
You know where to expect your opponent's attack. When the enemy's
weapon comes into range you are prepared to beat

Your first contact should be made with the opponent's blade. Do
not overshoot beat or point will not line up on opponent
The fingers on the left hand may be opened on thrust. Your piece,
grasped by the right fingers, is powered by right arm
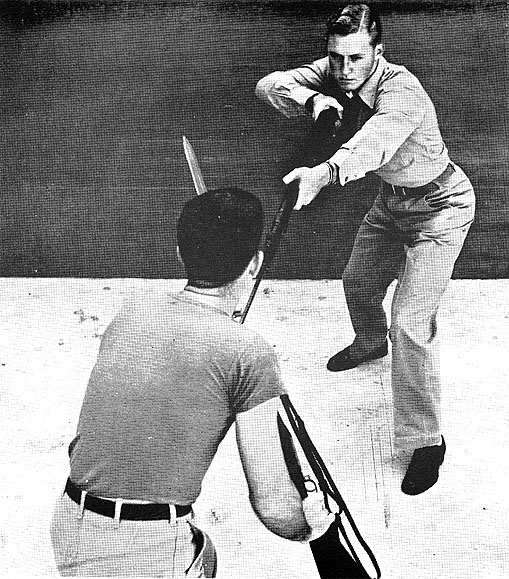
THE THROW POINT
When you find an exposed target, for example, if your opponent
drops his blade too low for you to successfully beat it aside, SNAP
THE WHOLE WEAPON FORWARD with the full power of the right arm, the
right hand grasping the small of the stock. The piece is guided
to the enemy's throat or chest In the left hand which releases its
grip, allowing the piece to be extended. RECOVER IMMEDIATELY TO
THE GUARD POSITION.
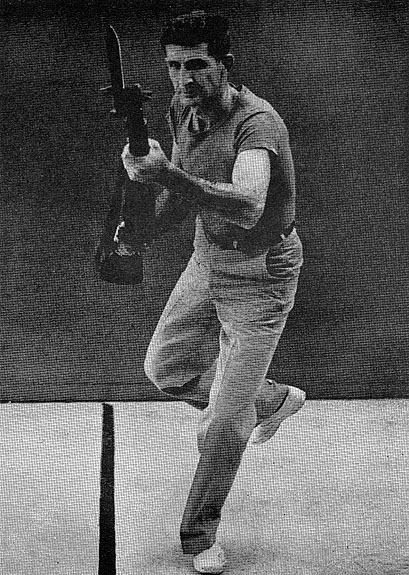
You will find the Throw Point effective in nailing opponents on
the run. In a chase, your enemy may escape unless you take advantage
of the added reach provided by the Throw Point. USE IT QUICKLY!
The long throw point should not be attempted unless you are armed
with a carbine. The left arm thrown back adds power
Throw point with carbine to the head. The weapon is guided to target
by left hand. The right hand grasps small of stock
Throw point with M-l. Movement can be accomplished either without
a beat or after a beat. Open left hand guides weapon
THE HAND CUT
Bayonet fighting is deeply indebted to the science of sword play
for many tricks of its trade. The effective Hand Cut, relatively
unknown by other nations, is a valuable carry-over from sword fighting.
The Hand Cut is directed at your opponent's left hand which is extended,
supporting the piece. DO NOT ATTEMPT TO USE THE POINT, instead,
the cutting edge of the blade is brought down on the enemy's left
hand - lobbing off as many fingers as possible. A crippled opponent
is easy prey for a final thrust.
The Throw Point can be us'ed effectively in the Hand Cut but in
most instances a Beat Cut will be more accurate and decisive.
Throw point to opponent's extended hand in attempt to make a hand
cut. Left step simultaneously accompanies this action

Close up of the hand cut. You will gain an early advantage if your
cut is successful

The hand cut with the carbine. Glide your blade down along the side
of your snemy's front hand guard, chopping fingers
THE BUTT STROKE
The BLADE is more cleadiy than llie BLTT, and most Butt Strikes
leave the blade facing in tlie opposite direction of the larget.
However, ONE Butt Stroke IS prescribed.
Remember that your rifle is primarily a SHOOTING weapon, and, as
such. it should be valued. A man should come out of a bayonet engagement
with blood on his blade, and his rifle in perfect condition.
Butt Strokes can easily reduce your piece to kindling wood.
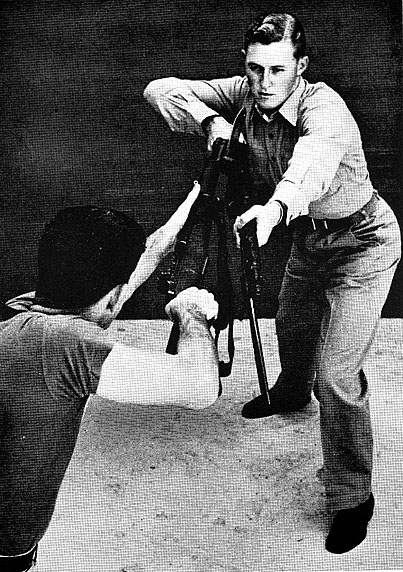
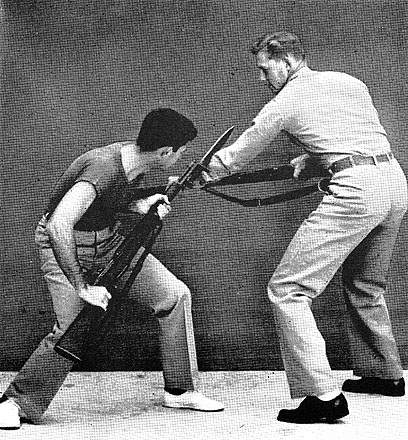
The Prescribed Butt Stroke
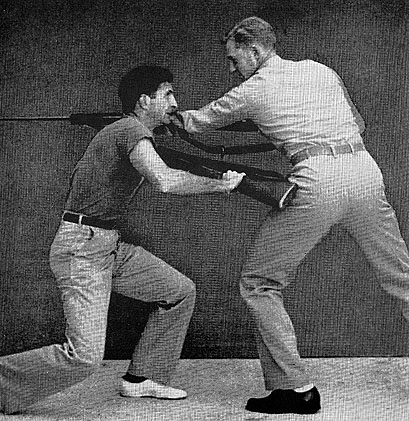
This stroke follows an unsuccessful Beat Thrust, PROVIDED YOUR
OPPONENT HAS BLOCKED THE COMPLETION OF YOUR THRUST by forcing your
blade UPWARD with his piece.
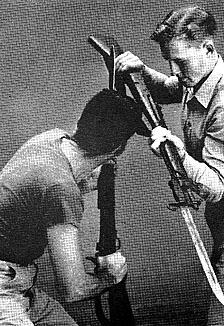
When your opponent's piece is in this position it is impossible
for him to protect his GROIN - that's where you plant a hard, direct
Butt Stroke immediately. The blow, if well placed, will eliminate
any further resistance from your opponent, and the softness of that
area of his body cannot damage your weapon.
If an opponent blocks your thrust this way he will be unable to
protect lower region of his body. Step in with rear foot
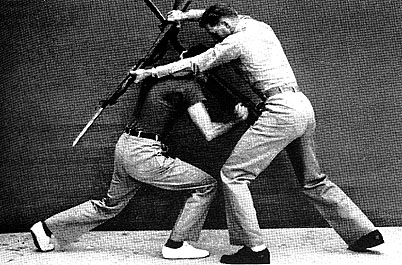
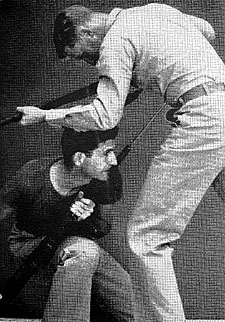
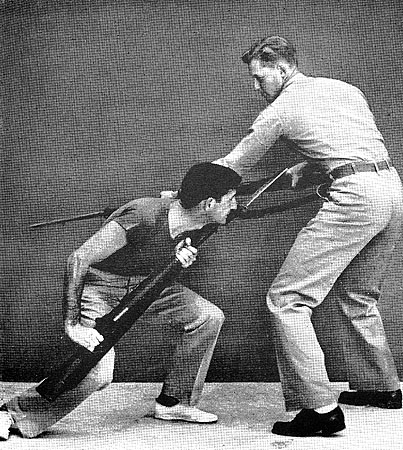
If it is impossible for you to use the point of the blade, stoop
and smash your opponent's groin with prescribed butt stroke
After butt stroke lower body and spring with a short jab
If thrust fails, hand cut will block opponent's butt stroke
LOCKED PIECES
If your Beat parry is unsuccessful and results in locking pieces
with your opponent, TRY THE PRESCRIBED BUTT STROKE. If a
Butt Stroke is impossible TRY FOR A HAND CUT.
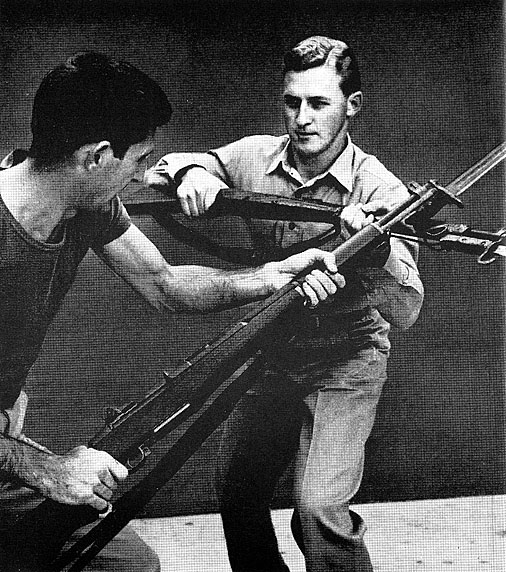
If your pieces are locked on your right you have the following alternatives:
1. Bounce your blade repeatedly against the enemy's blade and work
your blade into a position from which you can tilt your weapon and
slice or chop off his fingers.
When your beat fails, locked pieces will result. Bounce your blade
on his weapon until you are ready to try for hand cut
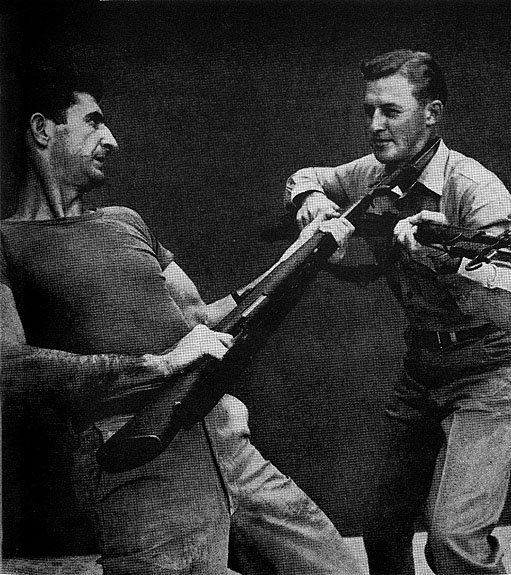
2. Release your pressure on his blade slightly, enough to enable
you to guide his blade over to your left; then QUICKLY releasr 1e
pressure entirely, whipping your blade around and into position
for a Thrust, Hand Cut or Head Cut. The choice is yours because
you are on his LEFT SIDE - his weakest and most vulnerable side.
His whole left arm is yours if you want it; chop it with the cutting
edge of your blade or bring your blade across the side of his head.
Release the pressure on your opponent's blade until you are able
to maneuver it to a harmless position on your left side
3. Close in tight and drop down, bringin the pieces in close to
you;
then work the point back and fdith with your arms and body in a
swinging or up and down motion. KEEP YOUR ARMS LOCKED:
the motion should come from your legs and body. Your hands need
not change their position on the piece. You can hug the weapon as
closely as you wish with the "GUARD" hold.
After his blade has cleared your head, disengage your piece abruptly
and whip it around. Try for hand, arm or head cut
4. Don't forget that you have two heavily-shod feet. USE THEM TO
CRUSH YOUR OPPONENT'S FOUNDATION - his instep, shin bone or knee.
USE YOUR OWN KNEES, they are excellent battering rams - very effective
when brought up swiftly and solidly into your opponent's groin.
Following your cut, drop into a position for a short jab. Full leg
action will provide the jab with an additional power drive
If you have overshot your beat and the weapons are locked on the
right, bounce your piece into position for a head cut
If you find that your blade is out of line on your opponent's left
side, whip the piece back into his throat or side of head
TARGETS
Your targets in bayonet fighting are, of course, any targer you
can hit, but there is a preferable target. One thrust
of only three inches of blade in the THROAT or CENTER CHEST area
will abruptly end that particular personal engagement. The major
veins and arteries are bunched, practically unprotected, in these
two areas. They are fairly close to the surface, therefore, more
easily severed than in other uortions of the body.
Place your fist on your chest, between the left nipple and the center
breast bone; this is the location ot vour heart which is just about
the size of your fist.
Above the heart lies the largest artery of the body. From this artery,
which is as thick as a garden hose, spring numerous smaller arteries.
Along both sides of the windpipe are large arteries which supply
the blood being pumped to the head. Their pulsation can be felt
by placing the fingers on each side of the windpipe and applying
slight pressure.
The neck area contains in addition, four large jugular veins which
carry the blood down from the head.
The spine is the only bone in the neck but it is located in the
rear, leaving the front of the throat vulnerable to attack - and
an instantly fatal target for a thrust or cut.
In spite of all the speculation about the blade becoming lodged
or catching the bone when it is thrust into the chest area, YOUR
BLADE WILL NOT GET CAUGHT IN A BONE! The framework in that area
is composed mostly of cartilage; the small percentage of bone in
that portion of the body is very thin. It takes little effort to
thrust through. DON'T thrust through to the shoulder blades.
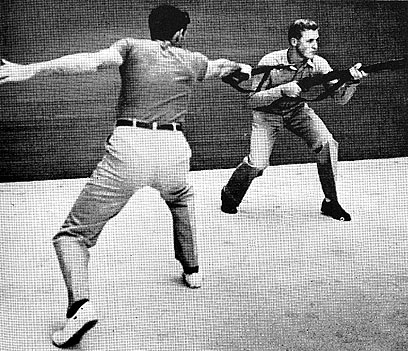
THE IN-QUARTATA OR OUT OF LINE
This is the only prescribed movement which is purely defensive.
It is used most effectively against any running attack coming in
your direction.
Wait, or halt momentarily in the guard position, until
your opponent comes within range. At this moment, snap your whole
body to your left, pivoting on the left
foot, propelled by a thrust with your right leg which,
crosses behind the left foot.
Your spin has removed your whole body from the line of your enemy's
attack. HE WILL MISS YOU BY ABOUT THREE FEET. As you spin, the point
of your piece will swing into direct line with your opponent's attack.
You may thrust or just leave your blade there; the momentum of his
attack will force him to run into it.
If your opponent rushes you in a wild plunge, instantly snap to
the guard position in a direct line with his headlong attack
The instant that your opponent comes into range execute the beat
and, at the same time, propel body to left with rear foot
As you execute the full beat, your body, well balanced on the forward
foot, will pivot out of line with your opponent's attack
You have removed yourself from your enemy's line of attack. Execute
a full thrust into his onrushing body as it passes you
YELLING
The value of YELLING "hen making an attack cannot be overemphasized.
A lusty shout at the right moment can distract your opponent, momentarily
paralyzing his ability to think. It is an established tact that
yelling will harden the muscles of your stomach and chest, increasing
the power of your attack.
THE VOLT
Pivoting to change direction is called VOLTING. LEAP into the air
and land in the desired direction at the guard position. Practice
will make your VOLT simple, fast and effective.
NOTES
SHOOT if you can.
DON'T get "POSE HAPPY" in learning the technique of the
bayonet Master the fundamental principles and learn to execute them
efficiently.
RELAX. Remain at ease; avoid stiffness. Keep your mind and body
functioning smoothly and alertly by sizing up the situation and
making quick decisions. Knowing what to do, and when to do it will
eliminate dangerous tension.
Practice PULLING YOUR PUNCH when you Beat. Beat vigorously but STOP
when your point is LINED UP with your opponent's throat or chest.
Knife Fighting
The sight of sharp, cold steel in your enemy's hand is not a pleasant
sight. Knife fighting is an ugly business; it means steel against
steel; then steel against flesh - and death.
Let's take a look at your enemy's blood.
That's one thing you can't draw from the quartermaster by signing
a chit.
But it's a lot easier to draw than size 13 boondockers - you know
that your enemy has it ...
You're far behind the lines, maybe you're a communications man operating
your switchboard. Your carbine is propped against a tree nearby.
Your outfit is in the area but out of sight. You're alone, and you're
intent on your job.
You've been warned that there is the possibility of guerrilla activity
and infiltration. Your knife is constantly at your side. It gives
you a great deal of confidence, but your real assurance comes from
your confidence in your own ability to save your own life with that
knife by carving out a heavenly military career for your enemy in
whatever particular Valhalla he happens to believe exists.
A twig snaps!
You look up from the switchboard.
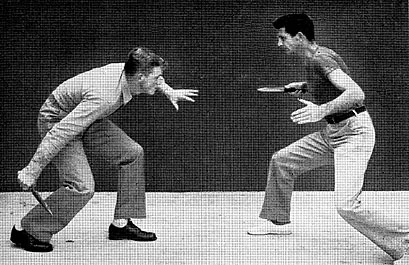
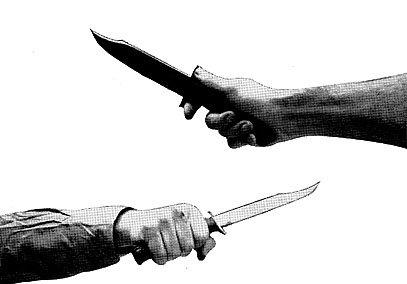
An enemy is rushing at you, both hands raised-in each a knife!
He's got one objective:
To drive them downward into your chest!
"MOVE, BOY!"
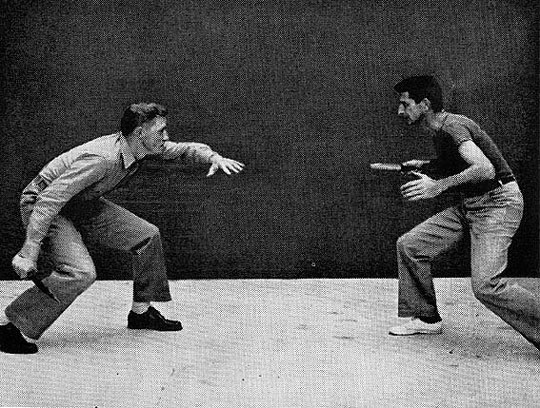
You move. You whip up your knife; you leap into the guard position.
Your enemy slows his advance; immediately he realizes that before
him is no frightened schoolboy. Instead, he sees a calm, fighting
man - poised, ready for instantaneous action, armed with deadly
steel, its point directed menacingly at his throat.
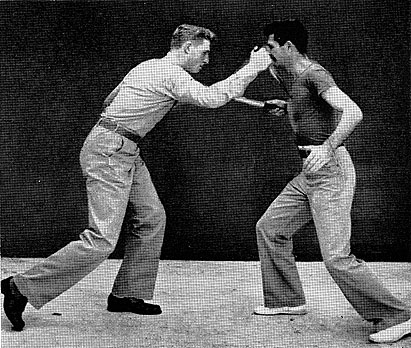
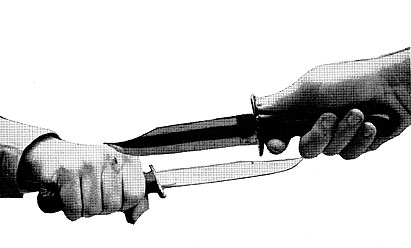
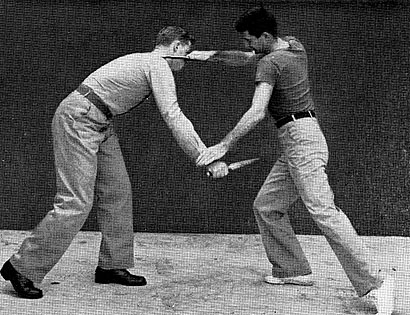
You advance cautiously into your proper range, your knife never
wavering from his throat. Both of his fists are out in front of
him. They are your first targets.
Too late, he realizes that your range is greater than his, and that
he has allowed you to come in too close. Like the fangs of a cobra
your blade strikes out in a full cut and you are back in your guard
position, your blade again pointed at his throat.
There is a dull thud on the ground and a mild ping as the knife
falls from your opponent's left hand, along with parts of his fingers
if your cut has been accurate and hard.
You have stunned your opponent; you can afford a split second before
pressing the attack. From your guard position you lower yourself
quickly, and with your blade still pointed at his throat, you scoop
up a handful of dirt and return to the guard position.
You are ready for the kill. Your enemy is now in a do or die rage;
his only thought is to kill YOU any way he can. He raises his blade
beside his head and charges.
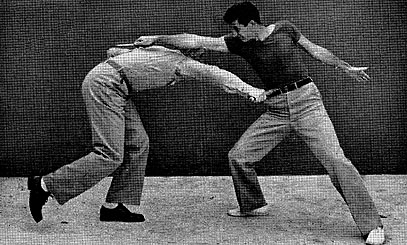
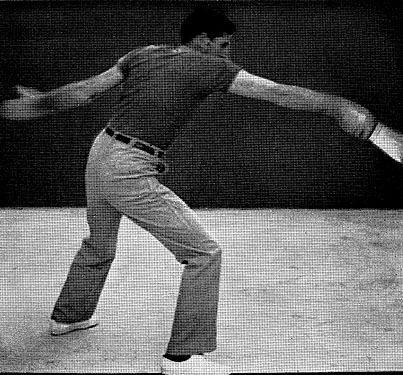
You heave the dirt, execute an in-quartata, and yell. Your target
is his heart.
As he hurtles by the spot you vacated a moment before, your blade
is almost wrenched from your hand as it cuts its way out of his
body.
Your opponent is now lying about five yards beyond the spot in which
he had intended to leave YOUR lifeless form.
Cautiously you inspect the corpse of your enemy. Your job was clean.
There was no need for in-fighting.
"Just like that?" you ask cynically.
We nod.
"But that wasn't me in that knife fight," you insist.
"It must have been some other guy, an expert, maybe..."
You don't need to be an expert to stand your ground in the guard
position and engage an enemy with confidence. A sound KNOWLEDGE
of knife fighting and PRACTICE of its basic PRINCIPLES will make
you a dangerous opponent for any knife-wielding enemy.
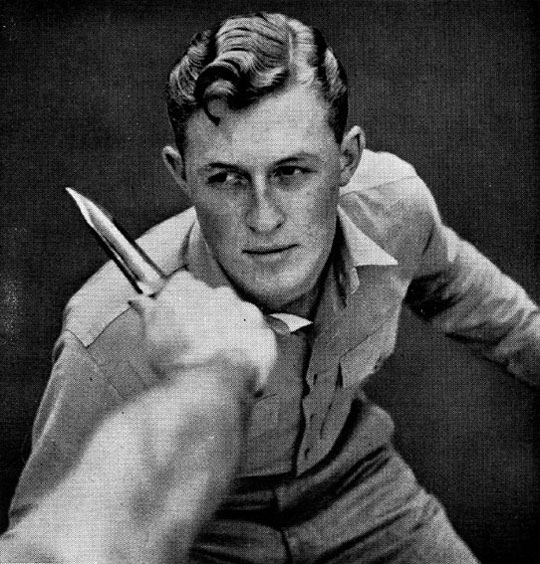
Knife fighting is based on the age-old science of swordsmanship.
These principles of swordplay were utilized by James Bowie in his
fine technique with his Bowie knife-making Bowie and the Bowie Knife
one of the deadliest blade combinations the world has ever known,
HOLDING THE KNIFE
Here, take this knife.
Now, hold it straight, NOT cocked upward. Put your thumb directly
on top of the handle, on the SAME side as the FLAT EDGE of the blade
- that's right, the cutting edge faces DOWNWARD.
Now, clamp the fingers securely UPWARD around the handle. Lock your
wrist when the ELBOW and the POINT of the knife are in a STRAIGHT
LINE. THE KNIFE IS MERELY AN EXTENSION OF THE FOREARM.
Keep the thumb about a quarter of an inch from the thumb guard.
This space is allowed to take up the shock caused by the impact
when your knife strikes its target.
Tips
1. Keep the wrist LOCKED at all times.
2. DON O arch the thumb on the thumb guard.
3. Keep the blade ON LINE with the FOREARM.
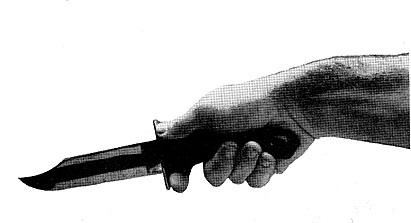
The hold. Fingers are wrapped securely around the handle, thumb
on top, point of your blade is on a line with the elbow
THE STANCE
The proper fighting GUARD position is taken directly from the stance
of the skilled swordsman. There are only two changes. These changes
are made, only when learning, after the proper SABRE STANCE has
been assumed. In actual combat you snap IMMEDIATELY into the KNIFE
FIGHTING GUARD POSITION.
The Sabre Stance
1. Face your opponent at attention.
2. Execute a LEFT FACE.
3. Execute a "close interval DRESS RIGHT." (Glance at
your opponent, placing the left hand on the hip at the same time.)
4. Point your RIGHT FOOT at your opponent and advance it about TWO
FEET in his direction.
5. Raise your RIGHT FOREARM, aiming the point of your knife directly
at your opponent's throat. Your ELBOW will be approximately six
inches forward from your HIP.
6. The knees are slightly bent until the lower part of the RIGHT
LEG is straight up and down-ready for instantaneous advance or withdrawal.
7. The CUTTING EDGE of the blade should be facing DOWN and to the
RIGHT in an unstrained, natural position.
8. YOUR WRIST IS LOCKED.
9. Keep the upper part of the body ERECT at all times. This is the
proper SABRE STANCE. Notice how easily you are able to advance and
withdraw-forward and backward. Movement to
the left or right is more difficult.
In practice, a knife, bayonet or stick may represent the sabre.
To assume the knife duelist stance from the sabre stance
1. Assume that there is a STRAIGHT LINE between you and your opponent.
Move your REAR foot from one to two feet LEFT of this line, forming
a 90 degree angle to your opponent with your feet. IN THIS POSITION
YOU HAVE COMPLETE STABILITY. You can propel yourself easily and
quickly either BACKWARD or FORWARD or to the LEFT or RIGHT.
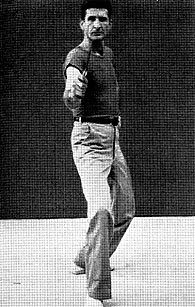
The sabre stance, foundation for the knife fighter's stance
Sabre stance to knife fighter stance. Move rear foot to left
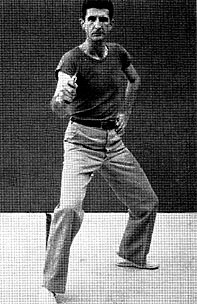
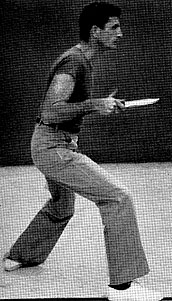
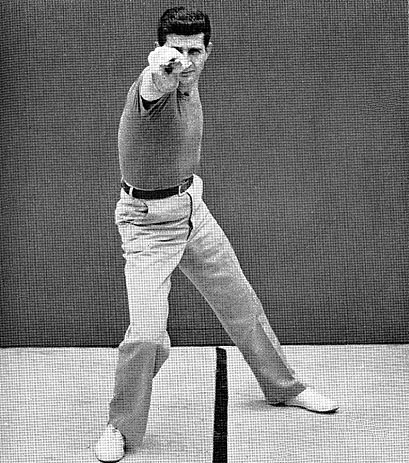
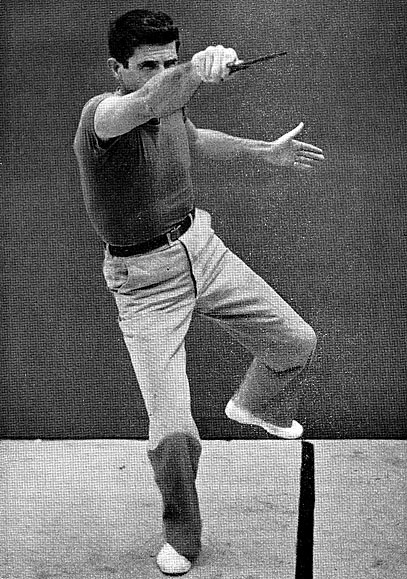
The guard position. Left arm free. Knife arm drawn back
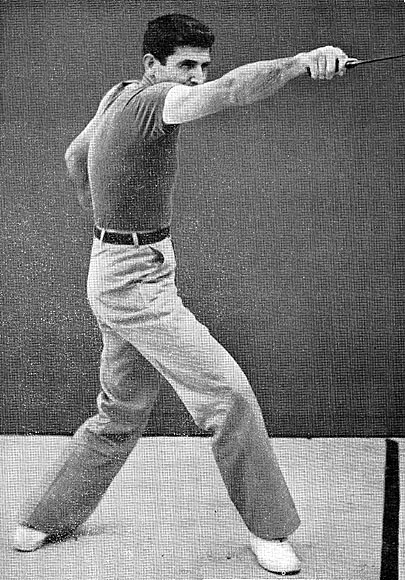
The thrust. Blade drives into target. Free arm snaps back
2. Draw the arm which holds the knife BACK, CLOSE TO THE BODY and,
at the same time, square your shoulders to your opponent. In sabre
fighting the arm can be safely extended because the weapon is long
and the handle is equipped with a hand guard. In knife fighting
you have a lightning-fast blade but there is little protection for
the hand.
3. The LEFT ARM swings FREE of the body.
Your body should be relaxed WITH THE EXCEPTION of the LOCKED WRIST
and the THIGHS which are taut because of the bent knees.
Your shoulders face your opponent squarely. In this position there
will be no lead with your shoulder and knife betraying the nature
of your attack.
The guard position will become a natural reaction. Place a sabre
or a rapier in the hand of an experienced duelist and he will immediately
snap into the guard position with a reflex action almost as strong
as drawing the hand from a hot surface. This may be difficult to
understand at first, but be assured, it is true and after a moderate
amount of knife-fighting practice, you'll find yourself assuming
the guard position without thinking about it, the moment you have
a knife in your hand.
Tips
1. Keep your feet at about a 90 degree angle.
2. The blade is drawn in, close to the body, and held in an unbroken
line from your elbow to the point.
3. Shoulders face the opponent squarely.
4. Torso and head are held erect.
5. The arm on hip should swing free, but care must be taken to prevent
it from extending beyond the hand which holds the knife.
6. Your blade points directly at your opponent's throat. PRACTICE
all the points of the proper stance until you can draw your blade
on command of "On Guard!" and instantaneously snap into
the perfect position without losing a second to make major adjustments.
The side view of the guard position. Major portions of the body
will not be extended into an opponent's range
The straight thrust, side view. The torso pivots on axis of spine.
Your legs provide added range
PRACTICE until ALL of the points in the ON GUARD position become
coordinated into ONE natural movement.
ALL OF THE ATTACKS AND DEFENSES OF THE SKILLED KNIFE FIGHTER ORIGINATE
FROM THIS GUARD POSITION.
THE THRUST
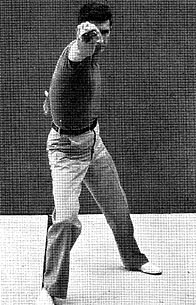
From the guard position, the blade is thrust forward with explosive
force DIRECTLY at the target. The free arm is whipped back to add
power and velocity to this POINT-AT-TARGET attack.
The BLADE POINT travels straight to the TARGET, backed by the full
power of the forearm and shoulder.
The THRUST starts with the knife, poised and ready in the guard
position. NO PRELIMINARY MOVEMENT IS NECESSARY. The blade is snapped
directly to the target. If the target is your opponent's throat
your point should strike in a direct line to the throat.
On the thrust, the free aria has been whipped back, TURNING THE
FULL BODY WITH A SNAP. Instead of the full spread of the shoulders
and chest which had been exposed to your opponent, you now present
the NARROWEST view of your body. The upper portion of the body has
pivoted forming a straight line from your blade point back along
your arm, across the shoulders and down the free arm in the rear.
In executing the thrust, the beginner will have a tendency to lean
forward and push. The result of a push is usually an UNEVEN and
weak action. Your attack should be instantaneous. From the front,
your opponent should see only the blur of a point on the extended
arm, and the sudden disappearance of the broadside view of your
upper body; in its place, your enemy will find only the thin silhouette
of the NARROWEST portion of the torso.
The attitude of your blade, well back and pointed at your opponent's
throat, is like a pistol leveled at a target - ammo in the chamber,
the hammer back, your finger on the trigger. The point
is your bullet.
THE THRUST, when properly executed with your opponent withinithin
range, will be so swift that he'll never see it.
He won't know what hit him.
He won't see it coming.
Nor can he PREVENT getting HIT.
This is true in professional boxing. If an opponent is open
and in range of a left jab, he's going to be hit.
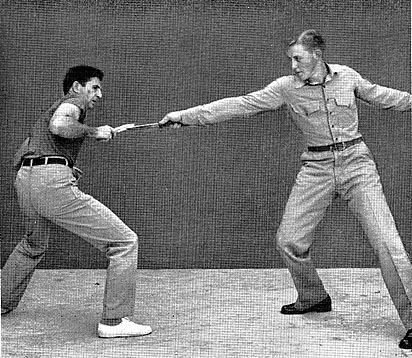
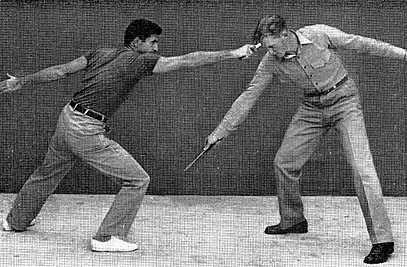
If an opponent tries to make an underhanded attack he will come
within your range but you will still be out of his reach
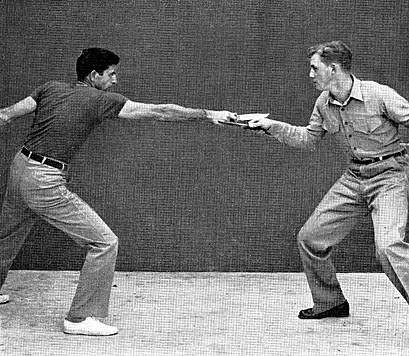
Your advantage over your opponent is a range of eighteen to twenty-four
inches. If the enemy attacks, he comes into range
The only way to avoid getting hit is NOT to be THERE to get hit.
Simply said. Simply explained - later. But here's a hint:
DISTANCE is of utmost importance. It is INSURANCE again
NOT being THERE to get hit, AND STILL BEING IN A POSITION
TO run your opponent through.
Tips
1. When THE THRUST is executed in practice and the blade is not
driven into human flesh; the blade completes its thrust in mid air
where it stops abruptly with a NATURAL WHIPPING ACTION.
It is the conviction of the writer that the Bowie-shaped blade was
scientifically designed by James Bowie for the control of this natural
whip.
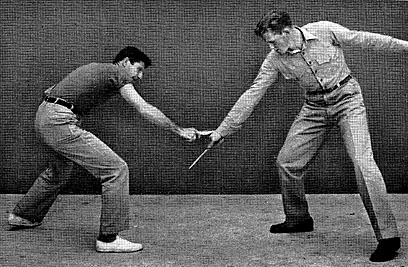
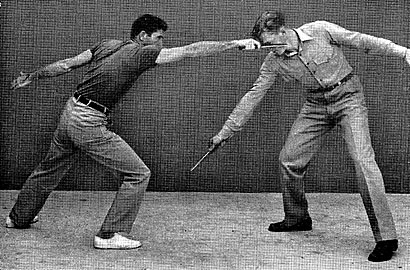
If your opponent tries an overhand stroke he must come in close;
your straight thrust pivots your chest out of his range
2. The THRUSTING HAND, when fully extended, should have the KNUCKLES
UP, the THUMB LEFT and the knife arching slightly downward into
the target. The FULL thrust is executed regardless of your opponent's
distance-as long as he is IN RANGE.
3. Do not be too anxious to draw the weapon back prematurely. Let
the extended arm SNAP OUT TO THE FULLEST.
4. Only in a well-executed thrust which does NOT strike home, will
you find the whip-like movement of the blade. When the point reaches
its target, penetrating flesh or bone, the whip is taken up by the
substance which is hit.

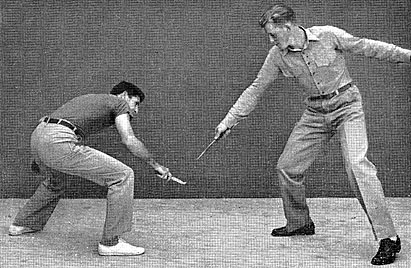
An enemy's overhand stroke leaves him wide open for your thrust.
He can be stopped before he reaches effective range
THE CUT
The thrust is the foundation of the CUT. With the thrust you take
your knife to the target. If a FULL thrust does not strike the target
the natural whipping action will take place. This whip is THE CUT.
The Vertical Cut
The VERTICAL CUT is a thrust which ends abruptly with the THUMB
UP, the NAILS to the LEFT.
When this thrusting cut goes straight to its target ins+ead of ending
in mid-air, this same whipping action will take place
The vertical cut - fast and effective for a long range slash. Whip
down
The natural whipping action of the thrusting cut makes the blade
drop
An extended extremity, such as a protruding arm, is an excellent
target for the VERTICAL CUT. In this cut the blade flashes DOWN
and UP, biting gashes into the flesh or lobbing off fingers. The
blade, when executing this action does not only whip DOWN and UP,
but when it is viewed from the side, the observer will notice that
it also RIPS FORWARD. Where a stiletto or narrow pointed knife would
penetrate like an ice pick and leave a puncture wound, the Bowie-shaped
blade will whip down into the target, ride forward, then snap UP.
THIS IS ONE CONTINUOUS ACTION. The movement has been completed in
one ninety-fourth of a second when recorded by a highspeed camera.
All tissues, muscles, veins or tendons caught in the path of the
scimilar-like hook of the Bowie blade will be sliced clean through.
Keep full thrust's distance from opponent's nearest extremity. If
nearest target is hand or forearm, execute a thrusting cut

The vertical thrusting cut to the hand. The blade is cocked in preparation
for a wrist action to supplement the natural whip

Vertical thrusting cut ends with the blade biting down, ripping
forward, then snapping up again - all in a continuous action
The Horizontal Cut
The HORIZONTAL CUT, straight across and back. is purely an unfulfilled
normal thrust.
The tendency of the average knife fighter to crouch usually places
his head and face in such a position that they present excellent
targets for the HORIZONTAL CUT.
The horizontal thrusting cut. A full thrust is directed to right
side of your target. Slightly cocked blade assists whip action
The blade will whip across its target automatically when the arm
is fully extended. Try for cuts on enemy's head or face
The finish of your horizontal thrusting cut. The blade whips back
across target, achieving two cuts with only one thrust
The Hand Cut
The HAND CUT can be an exquisitely executed attack. From the hand
of a skilled knife duelist this cut, practically unknown to the
overhand or underhand knife fighter, can usually be relied upon
to effectively strike the first blow. A deeply sliced hand will
greatly reduce the strength of your opponent's knife hand, but if
you hack off a few fingers with your initial HAND CUT you have it
made!
Practice
These cuts may be practiced with an actual or simulated weapon,
but when learning, the use of the hand in lieu of the weapon is
advised. Master the whip of the HAND and you will develop a better
understanding of the action of the blade.
When the hand alone is used, the fingers should be extended and
joined; the edge of the hand opposite the thumb becomes the imaginary
cutting edge of the knife. The hand is thrust out vigorously, coming
to an abrupt halt at the fullest extension of the arm. A whip-like
snap of the hand will take place. This practice will be valuable
if you are ever confronted by an opponent when you are unarmed,
for the edge of the hand, in this position, is used like an axe;
the fingers joined at the tip are like the point of a blade.
After mastering the cut as directed, you may then increase the effectiveness
of the blade by a snapping WRIST action in a whip-like manner, directing
the cutting edge of your blade to its target with greater velocity.
This sharp wrist-snapping cut is of utmost importance when tiir
target is so close that it must be reached without fully extending
your arm.
Tips
1. When learning the full extended cut, which is a result of the
unfulfilled thrust, there will be a marked tendency to assist the
action with wrist movement. AVOID THIS WHEN LEARNING. The cut is
a completely natural action of the arm. Later when you understand
this natural action, you may add additional wrist action to supplement
the natural whip.
2. Draw the blade back to the guard position immediately after the
cut is made.
3. Keep the blade pointed at the throat at all times except when
making definite attacks to other targets.
4. Practice executing the full VERTICAL and HORIZONTAL CUT until
the action is clean. The blade must avoid making circles at the
full extension of the arm. These circles are the result of forced
action of the wrist or forearm, preventing the NATURAL ACTION of
the blade.
5. Begin your practice with the hand so that you may better understand
and control the whip action.
6. Continue your practice until you work out the stiffness in the
elbow joint. The tendons in this area will feel the strain while
you're learning the thrust and cut.
The in-quartata or out-of-line starts from the guard position. Conceal
the nature of your attack until opponent is in range
IN-QUARTATA OR OUT-OF-LINE
The defensive movement in fencing known as in-quartata or OUT-OF-LINE
is a fine movement of the feet which throws the body approximately
three feet out of the line of your opponent's attack if he attacks
with so much force that you do not choose to be there to meet it
with a stop thrust.
From your guard position, knees slightly bent, you execute a full
thrust as the torso vigorously pivots, assisted by the free arm
whipping back.
When opponent rushes into range, thrust home and apply power with
the rear leg, directing the body to the right side
You will also utilize the FULL POWER of your REAR leg to pivot
the whole body on the FORWARD leg. Your rear leg swings around in
an arc and lands on the opposite side. Your entire stance should
now look like a full sabre thrust from a sabre stance, but YOU ARE
AT AN ANGLE TO YOLR OPPONENT.
Your opponent's momentum will carry him over your original position,
by about two or three feet. There will be no need for you to withdraw
your blade from your opponent, his momentum will carry his BODY
OUT OF THE BLADE!
Your rear leg will push off and swing to the right, pivoting the
body out of line with the oncoming rush of your opponent
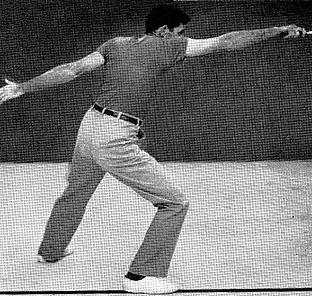
The full pivot out of line, with your rear foot solidly planted.
Retain your full thrust, letting the opponent cut the blade out

If you attack an enemy from the rear or flank, try a straight thrust
to the throat with the full edge, not the point, of your blade.
Immediately draw the knife back, snapping the cutting edge of the
knife across opponent's throat, making two cuts
DISTANCE
Now we're going to try to clear up some of those doubts in your
mind.
Sure, your opponent's got a knife - maybe he's got two knives.
And maybe he knows how to use them.
But, here and now, we want to cut you in on a big slice of scoop
- IF YOU'VE GOT A BOWIE KNIFE IN YOUR HAND you're armed with a BETTER
WEAPON than any other nation in the world has ever devised.
And that's only half the scoop. A KNOWLEDGE of the BASIC PRINCIPLES
of the use of the Bowie knife or ANY BLADE simply means that you'll
be able to save your blood for a Stateside blood bank instead of
leaving it on the battlefield.
Up to this point you've learned three basic principles:
THE GUARD POSITION.
THE THRUST.
THE CUT.
"All of this," you will say, "is fine on the drill
field or in a gym, but what do O do when I'm in combat and a crazy
enemy comes chargin' at me with a wicked lookin' dagger? The guy's
gonna kill me if I don't do something to stop him!"
You're right. He'll kill you if you don't do something immediately
to discourage him.
CONFIDENCE in YOURSELF is your primary MENTAL attack. A bucketful
of his wild zest will drain from him when he sees you plant yourself
in the guard position and DEFY him. He'll stop in his tracks and
think things over. You have won part of the mental duel. but the
physical bout has just begun.
SIZE UP YOUR OPPONENT.
You will be able to judge the EFFECTIVE RANGE of your opponent immediately
by the way he holds his blade and the stance he takes.
If your opponent has his blade in his RIGHT hand and has his LEFT
foot forward, he will telegraph his attack with a body movement,
even if he holds the blade in the sabre manner.
If he holds the blade in the OVERHAND or UNDERHAND position, or
in any position other than that of a sabre, he will
definitely LIMIT the effectiveness of his RANGE. This is the predominant
stance of most knife fighters throughout the world in spite of the
fact that it is contrary to the 400-year-old fencing principle of
keeping the RIGHT FOOT FORWARD.
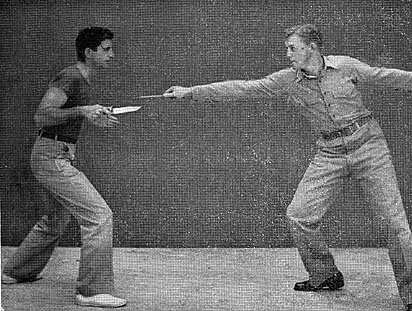
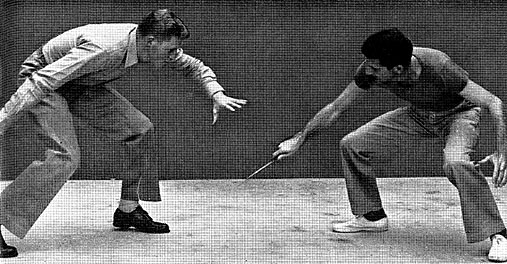
(A) Keep yourself out of range of your opponent's full thrust. If
he attacks, you'll be forcing him to come into your range
If he extends his knife-holding hand to any marked degree, regardless
of his grip, he is also LIMITING his range.
With practice, you will IMMEDIATELY notice these errors in your
opponent and TAKE ADVANTAGE OF THEM.
If you are confronted by an opponent who displays these errors,
the rule is simple:
STAY ONE FULL THRUST'S DISTANCE AWAY FROM YOUR OPPONENT'S NEAREST
EXTREMITY.
From this range you will be in a position to continually SNIPE at
him with LIGHTNING-LIKE cuts. You will be amazed to find that, although
he is in range of getting cut by your blade, he cannot try for a
cut on you without missing by ONE or TWO FEET.
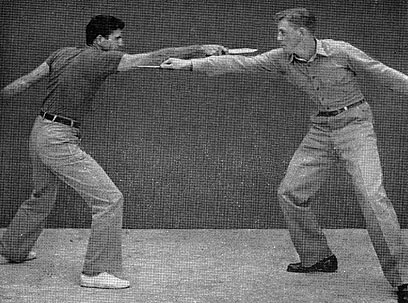
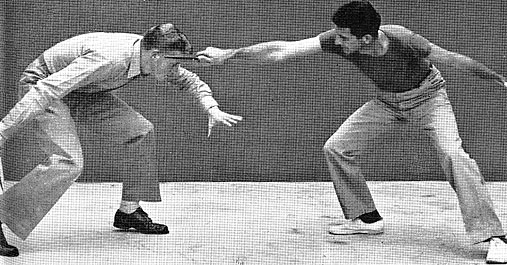
(A) Above picture shows your opponent in the same position as in
(A) on opposite page, but you have been able to advance
If your opponent should BODILY ADVANCE in an attack, MAKE IMMEDIATE
USE OF YOUR LEGS: they are slightly bent in the guard position and
ready for instantaneous action. If your enemy's advance is slow,
you merely STEP BACK - REAR foot FIRST, followed by the FORWARD
foot.
If you are pressing the attack aiul arc advancing, your first step
will be made by the FORWARD foot; bring the REAR foot up BEFORE
taking a second step with the FORWARD foot.
If your opponent assumes a skille'd knife duelist's stance you will
recognize it immediately - AND BECOME EXTREMELY CAUTIOUS. He will
be OUT OF RANGE. You will have NO immediate TARGET, and you will
have to work hard to GET one.
The slightest extension of your opponent's knife hand presents a
target. Strike and recover immediately to a guard position
With THIS opponent:
1. Your DISTANCE will be INCREASED. Stay one full thrust's distance
from his full thrust's distance. The distance is from HAND to HAND.
Your blade fully extended to his hand; his blade fully extended
to your hand.
2. Usually the HANDS will be your targets.
3. The duel is on, and you will have to resort to fencing TECHNIQUES
to draw him into your range.
4. Attack your opponent when he is LEAST alert to your attack. When
you sense that HE is about to attack, he will be thinking of HIS
OWN strategy - NOT of his own defense.
Draw your opponent into an attack but keep your body in a well-balanced
position and out of opponent's striking distance
5. You may wish to attack when your opponent is IN MOTION - EXECUTING
an attack or RETURNING from one. In this moment, his LACK OF BALANCE
and the DISTANCE will be definitely IN YOUR FAVOR. Once you have
launched your attack, catching your opponent off balance, force
vour attack with straight thrusts and cuts.
DISTANCE and TIMING are closely allied; distance is
a matter of keeping within a safe defensive range, and at the same
time, being within an effective offensive range. Timing
is something you will always have to FEEL; it is the ability to
recognize the proper moment to attack.

If your hand is too close to opponent's knife for a thrusting cut,
try for a sabre cut - a full, snapping chop at knife hand
TECHNIQUE
Technique is the ability to combine basic principles with their
best possible application to make the most skillful and formidable
attacks against an opponent. Crudely put, it is the use of every
trick you know to get your blade into your opponent.
Technique is NOT a sometimes thing; you acquire it with the PRACTICE
of BASIC PRINCIPLES, in your own, individual manner.
It will PAY OFF in blood on YOUR blade...
TARGETS
After the fight you'll probably want to wipe off your blade. But
if you don't hit anything you won't have to clean it; as a matter
of fact, if you don't hit anything, your opponent probably will
and what he hits will be PART OF YOU.
LOOK for targets on HIM, and let them feel your steel. IN A KNIFE
DUEL, ANY TARGET IS A GOOD ONE TO BEGIN. THE KILL, HOWEVER, IS THE
ULTIMATE.
Here are your targets:
1. The hand that holds his blade.
2. The heart which pumps his blood.
3. The throat which contains his windpipe and blood
supply to and from his head.
4. His chest area which contains his lungs, heart,
diaphragm and various other things he'd rather not have punctured.
5. His back, below the shoulder blades. Thrust the
knife INBOARD, toward the center of his body. Work your knife handle
back and forth; this will do far more damage than a single thrust.
In any portion of the back, chest, stomach or throat area PUMP THE
HANDLE OF YOUR KNIFE.
For an enemy attack, feint a low attack; draw his weapon low
When the opponent lowers his blade, attack his hand or wrist
Whip the blade up for a thrusting cut to your opponent's head
Attempt a straight thrust for your opponent's head or throat

Passata sotto, an alternative for out-of-line. If your opponent
rushes with exposed lower right side, thrust to lower chest
PASSATA SOTTO
Another means of getting your blade into your opponent, other than
the direct manner from the guard position, is to perform a passata
sotto in which you merely BEND THE TORSO VERY LOW and to the LEFT
from the guard position. Thrust directly into the LOWER RIGHT CHEST
or ABDOMINAL AREA of your opponent. This is a fine attack against
an opponent who raises his right arm high in his attack, or otherwise
exposes his lower right side. In some instances a left step may
accompany the attack.
This movement is also excellent for FAKING a low cut, drawing your
opponent's blade low, whereupon you strike for his HAND, FOREARM
or HEAD. If he refuses to be drawn low, you may safely risk an attack
on his KNEE CAP.
A feint, made to look like an actual attack, should affect your
opponent's reflexes, causing him to lower an offending guard
A full thrust or cutting attack may be made on your enemy's momentarily
open target. Low crouch puts his head in range
Keep your free hand in constant readiness to block enemy's blade
arm. When it comes in range grab his wrist and thrust
YOUR FIGHTING KNIFE
A stout blade of fine steel is the prerequisite when you go shopping
for your knife. The blade should be tough enough to resist most
impacts without showing a fixed bend. When severely strained beyond
the point of returning to its original position, the blade should
bend instead of snapping off. The steel should be hard enough to
hold an edge.
Clamp down hard on your opponent's wrist; at the same time move
your body in close and thrust your blade into the target
The knife should be from seven to ten inches in length and resemble
the form of the traditional American Bowie. The handle should be
long enough to fit comfortably and securely in the palm. The weight
of the handle should equal the weight of the blade in order to avoid
the feeling of "blade-heaviness" when the knife is "hefted."
The balance should be near the guard, preferably on the handle side.
Your knife should be equipped with a scabbard that can be secured
to the person in a manner which will make it possible to draw the
knife easily and quickly by a natural movement of the hand. The
scabbard should be secured vertically on the outside of the right
thigh. If this position is impractical because of other gear or
heavy clothing, the scabbard may be carried in a horizontal or diagonal
position on the front or left front beltline.
Regardless of where the knife is carried, it should be in constant
readiness for instant use.
WE REPEAT:
Knife fighting is an ugly business; we hope and pray that you'll
never meet an opponent armed with a blade, the look of a madman
in his eyes, hatred in his heart, and the momentary lust for YOUR
life.
But you might.
And in combat only ONE opponent comes out of a knife fight alive.
If we have succeeded in giving you CONFIDENCE in your own ability
with your knife, by these prescribed PRINCIPLES; if we have been
able to convince you that your enemy, whoever he is, HASN'T GOT
A CHANCE with HIS knife; then we have given you something with which
to save your OWN life.
Unarmed Combat
When Americans settle disputes with their fists - even in barroom
brawls - they fight with an admirable, inherent fairness. The tricks
of unfair fighting are not in the average American's repertoire;
even if he knows them, he will think twice before using them.
On the field of battle there is no time to think twice.
Remember that in combat you are playing for keeps; he who ponders
about tactics may not be around to enjoy the next rotation.
Obviously, the man fighting for his life will use every means -
fair and unfair-to save it, but the American must be taught "unfair"
fighting. On the BATTLEFIELD when his life is in the balance, he
CANNOT use effective attacks of hand-to-hand fighting if he DOESN'T
KNOW WHAT THEY ARE!
Nor will he be able to protect himself against the onslaught of
the dirty fighting he can expect from his opponent.
YOUR BEST DEFENSE IS A GOOD OFFENSE; it must combine your instinct
for survival and the practical application of proved principles.
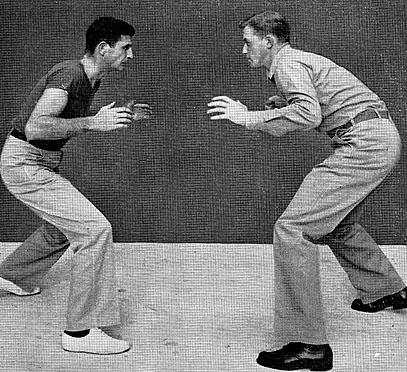
THE STANCE
Your STANCE should enable you to move instantly in any direction.
It should make you capable of launching the most eKective attack
to meet the existing situation.
ONE primary stance is recommended:
The knife fighters stance, with the RIGHT FOOT FORWARD.
Thrusting or wheeling attacks can be
launched from this position, as well as a rapid out-of-line pivot
in case of a rushing attack.
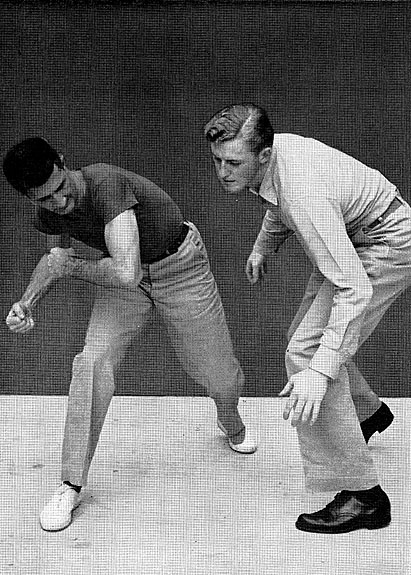
A diagonal position can be assumed directly from this
stance, with your weight on the REAR FOOT, FORWARD ARM raised, as
if in protection of the face. Your BODY is REARED BACK from an erect
position. From this position an effective kicking attack, from long
range, can be launched with the free FORWARD leg and foot. Following
the kick you are in a position to launch immediately a back-sweeping
elbow, side of the hand, or fist smash.
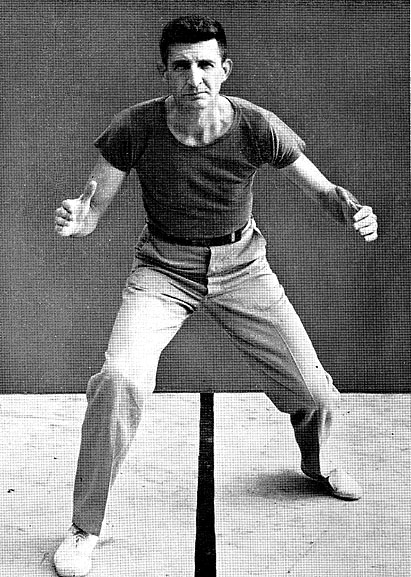
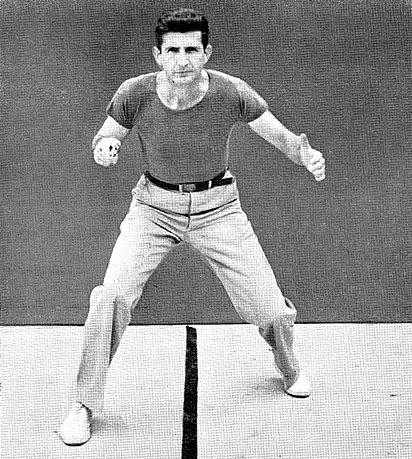
Use a well balanced knife fighter's stance and you will be in a
position to launch your attack or evade opponent's advance
YOUR PLANS OF ATTACK
Acquire, in the back of your mind, a "library" of PLANS
OF ATTACK. These plans are ALL SIMPLE and DIRECT and they will cover
a broad selection of situations, logical in individual combat.
Learn to choose the RIGHT attack instantly
Learn its timely execution.
These PLANS OF ATTACK must be PREARRANGED; they must be outlined
and developed in your mind, forming a detailed list from which you
may draw instantly when you are confronted with a situation which
threatens your life. When the situation confronts you, you will
have little time to think it over. A library of PREARRANGED PLANS
will be in readiness.
Like swimming, these plans once thoroughly learned, will never be
forgotten. Besides, you need not stay in top condition to apply
them effectively.
When danger is imminent and you are unarmed, if there is time, look
for something to supplement your natural weapons -
a stick, a stone, dirt, ANYTHING.
At the sight of your enemy coming at you, start to put into action
your prearranged plan of attack. Assume your proper
stance instantly;
your choice of attack will depend upon your enemy's stance and the
nature of HIS attack.
Launch your prearranged plan of attack the moment he comes within
range.
In your plan, simplicity and directness of action will be the keynote
of your attack. By TRAINED instinct you will direct your attack
in a manner which will exploit any disadvantage you can detect in
your opponent. Without a plan and the means to execute it, you are
lost. Once the action has started and you find that your original
plan is not working, you will automatically switch to another. You
will find that this is NOT difficult because ALL of your plans from
which you made your initial choice, were SIMPLE and DIRECT.
In the frenzy of a "to the death" struggle, anything short
of an absolute blackout blow on your enemy will allow him to remain
dangerously fighting for his life - or yours.
Your first step will be to snap yourself into your stance.
In an instant you will size up your enemy-his speed, the position
of his hands, the way he carries his head.
WITHOUT PREMEDITATION, execute your plan of attack
the instant he comes within range.
Remember, no one is going to set himself up for you to execute perfectly
any routine series of attacks. Explode your whole plan, or any part
of it, ALL OVER your enemy in rapid succession.
All of your plans of attack are drawn up with one
objective in mind - to achieve ultimate victory.
Perhaps you may accomplish this quickly with one direct attack that
strikes home...
Or it might be a long, drawn out operation...
In any case, your plan of attack should cover all
possibilities.
You know that the best way to destroy your enemy is to destroy his
primary targets first if you can. In a personal contact with an
individual enemy, destroy ANY ONE of his primary targets and victory
is yours.
Those primary or high priority targets are:
1. The throat.
2. The groin area.
3. The eyes.
A heavy pounding at ALL OTHER targets will directly or indirectly
damage the primary targets and will batter down resistance, allowing
OPENINGS for you into his primary targets, which you will immediately
attack in a manner prescribed in your plan of attack
- with hand and fist blows, crushing, gouging, ripping with fingers
and thumbs, elbow smashes, knee smashes and knee drops, kicks and
stomps with the foot.
From your stance you will attack the targets
described under "TARGETS", with the weapons
described under "WEAPONS", in a manner prescribed under
"ATTACKS."
ATTACKS
Distract and attempt to throw your enemy off balance by heaving
a handful of dirt, your cartridge belt, helmet, coins or cigarettes
at him. Throw ANYTHING you can get your hands on; throw it the moment
he comes into your range.
From the Knife Guard Position
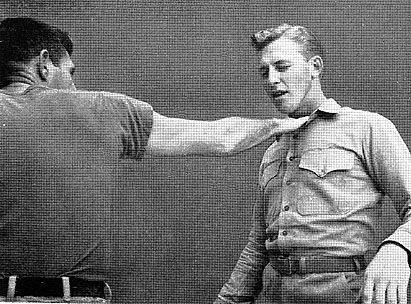
A. The Thrust Attack. If your enemy conies at you
with his ARMS LOW or spread out in such a manner as to expose his
HEAD. vc.u :; a, start your attack with an exploding STRAIGHT THRUST
with your RIGHT, or master hand in the same manner as the execution
of a knife thrust. If he is in range and is OPEN for
such a blow he will not be able to block it. It will land hard enough
for you to MOVE RIGHT IN, following your attack through at close
range - POINT BLANK range for your most effective blows.
If your opponent's hands are low or well into his body, you might
try a thrusting attack as soon as he comes into range
Depending upon the speed and stance
of your enemy, this type of initial attack may be launched in the
following manner:
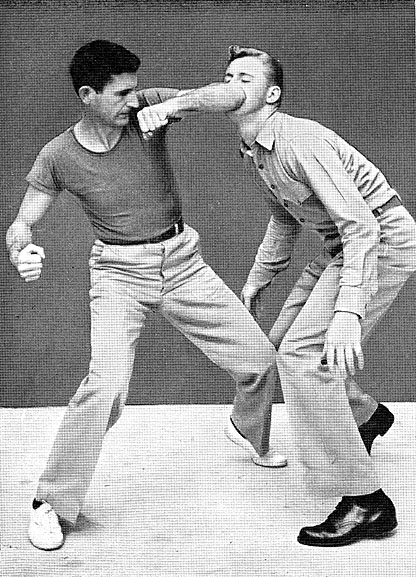
1. Fist exploding on his face.

The thrusting attack. Launch a smashing straight thrust into the
face or neck of your opponent. Wheel in with left elbow
2. Fingers extended and joined, thrust into his throat.
3. First two joints of the hand doubled up and thrust into his throat.
4. Fingers extended and spread, ramming them into his eyes.
B. Follow through of the Thrust Attack. The instant
your initial blow has landed, you wheel in close,
every weapon you have exploding on every target opening. If there
is no target opening, MAKE ONE, keep battering and pounding. It
will be impossible for your opponent to protect his COMPLETE body
at once. This should give you incentive and confidence. It is not
humanly possible for your enemy to protect his throat, groin, eyes,
solar plexis, base of skull, kidneys, etc., ALL at the same
time. You will be forcing the attack, keeping your enemy
off-balance and placing him iminedialely on the defensive; he will
be so busy protecting himself that the choice of targets will be
yours.
Smash the fingers straight into enemy's windpipe. They may be extended
and joined or the first two joints may be doubled
Immediately after a full left elbow smash you are in perfect position
to continue wheeling and smashing at opponent's head
The heavy artillery of the body's natural weapons consists of both
elbows, the sides of fists,
the knees and feet and the forehead
- used as battering rams.
When you close with your enemy, immediately following the right
thrust attack, wheel or pivot in with
a left elbow smash, the arms hooked, elbows and fists FLYING. All
of the way to the RIGHT, then BACK again, pressing the attack by
wheeling and smashing. EVERY full pivot will expose your enemy to
a hit from your elbows, fists and the sides of your fists.
The wheel back up to the opponent's jaw is accomplished by a vigorous
body pivot, adding power and velocity to the blow
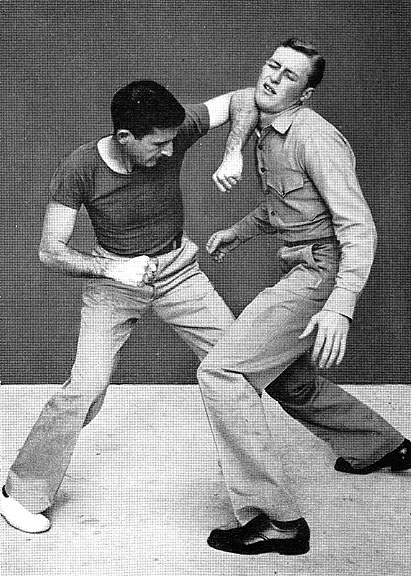
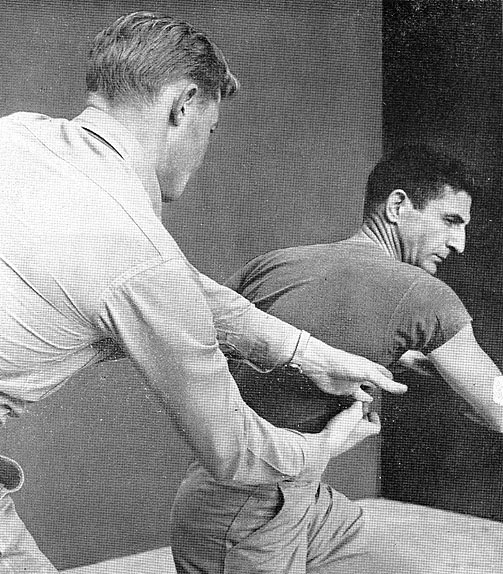
At completion of a left elbow back-smash, your right fist is in
position to deliver a solid hook into the groin or solar plexis
If this attack lands successfully and your enemy goes down - and
he is still moving - prepare to finish him off by planting
well placed toe kicks or heel stomps into the following targets:
1. Neck, anywhere, all the way around.
2. Groin.
3. Lower rib region, anywhere, all the way around.
4. All joints.
5. All muscles.
Finish him off with a vigorous stomp or kick to the neck, or a knee
drop to the same place.
KNEE DROPS are excellent when your enemy goes down. Merely drop
your entire weight, concentrated on ONE of your knees, on any part
of his anatomy. Something will GIVE! You may then finish him off
with hand blows or gouges and rips to the throat. However, it is
SAFER to kick and stomp when your enemy
goes down.
Possibilities
If after your initial attack and fellow-through, your enemy is
still fighting, you remain in close and keep up the assault.
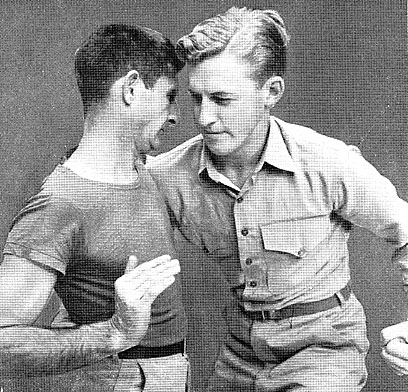
If he grabs your throat, your complete wheeling action
with a left or right elbow smash will break his grip.
If he grabs you low, he is exposing his head, neck,
etc. Smash at these targets with the sides of the fists, edges of
the hands and elbows.
If his head is high, smash and thrust at his throat,
with the hands and edges of the hands.
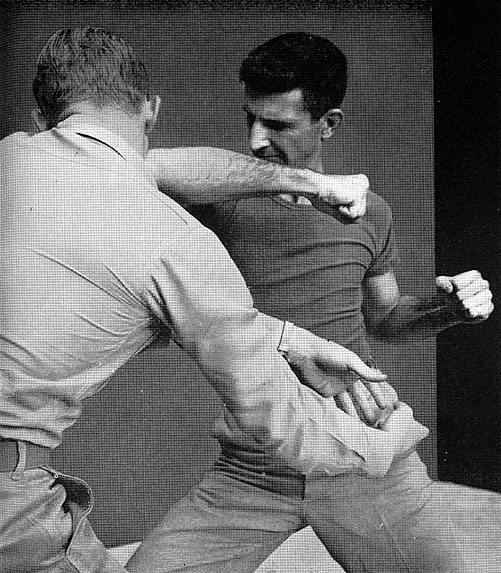
If he gets a dangerous hold on you, SLOW DOWN and
grab ONE of his offending fingers and BREAK it, or crush
his windpipe with the thumbs or a blow with the hand
or smash at his GROIN. Keep your hands moving in the direction of
his vital targets. (There are no easily acquired holds
that he can get on you which will keep your hands from reaching
his groin.) Once you get one of your hands in the vicinity of his
throat, eyes or groin, launch your most vigorous attack, smashing,
gouging, crushing and ripping.
If he is at any time knocked iff balance, leaving you out of arms
reach for a moment, kick him, concentrating on the groin, lower
rib area and throat area.
If his back is at any time available to you, leap upon it - apply
the double-arm strangle hold, wrapping the legs around his waist
in a scissors hold. This also will end the fight.
If your two hands are clear, and his ears are in range, slam both
hands over his ears as hard as you can. The result will be similar
to a blast concussion.
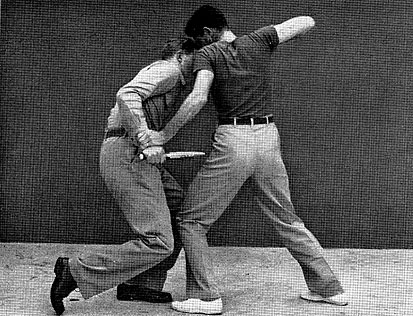
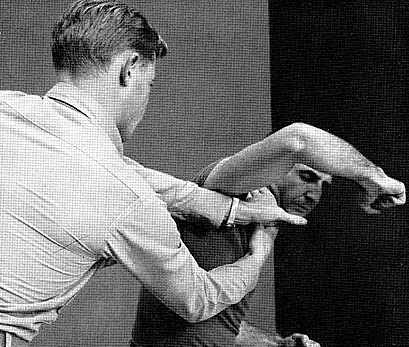
The Wheeling Attack
If a straight thrusting attack is impossible because of an opponent's
extended arms, launch a WHEELING ATTACK from your guard position.
If your opponent is facing slightly to the LEFT, wheel your attack
in the direction in which he is facing. If he is facing
RIGHT, wheel your attack in that direction. This attack will break
down his defense and SPIN him around, making any counter attack
impossible.
This pivoting right and left cross attack was introduced
by the late Robert Fitzsimmons who used it to win the heavyweight
championship over the late James J. Corbett. It was known as Fitzsimmons'
"killing shift."
Colonel A. J. Drexel Biddle's description of this attack clarifies
its execution. Here's how it's done:
From a regular boxer's stance (LEFT foot forward) a right hook is
aimed at your opponent's chin: at the same time the RIGHT FOOT steps
forward, adding speed and force to the blow. Your RIGHT FOOT should
advance outside of your opponent's LEFT FOOT.
If your right hook failed to land on your opponent's chin, all well
and good, the FOLLOW-THROUGH of the blow will have smashed down
the enemy's defenses, leaving you LOW and to his LEFT. Instantly
rip back up with your whole body, clearing everything with your
RIGHT ELBOW, but that LEFT FIST OF YOURS is brought up from the
floor and is planted in the SOLAR PLEXIS of your opponent. While
this doubles up your enemy, you return to the LOW POSITION and repeat
the LEFT HAND PUNCH. This time you can direct it to the point of
your opponent's chin. If delivered with KILLING INTENT, this last
blow can drive your opponent's jawbones into the base of his skull,
resulting in a brain concussion which can cause death.
On the battlefield, this same principle can be applied
from YOUR guard position (RIGHT foot forward) with NO regard for
the right elbow clearing before the LEFT fist comes
up. Nor is it necessary for you to direct the first left to the
solar plexis; a slight lowering of the range into the GROIN, will
be more effective for the result you wish to achieve. Keep your
body well-balanced with natural foot movements.
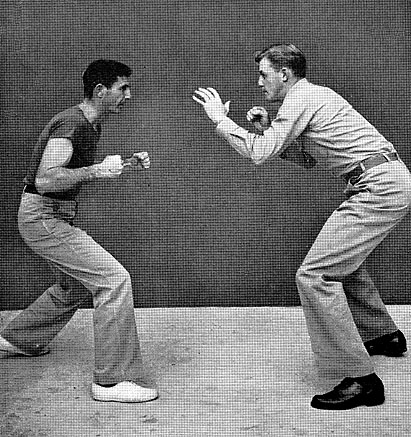
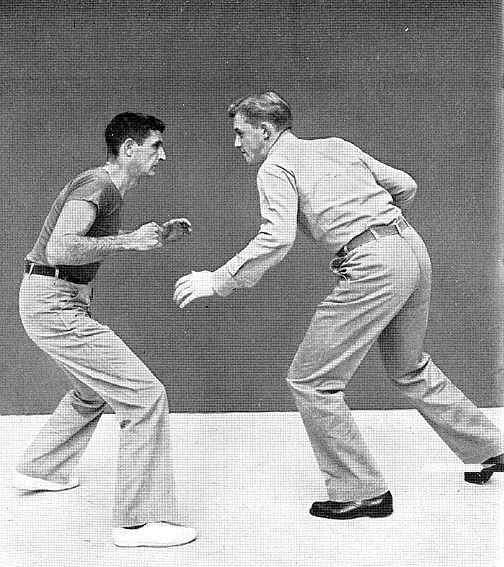
If the opponent keeps his face and neck well protected you can batter
down his defense by launching the wheeling attack
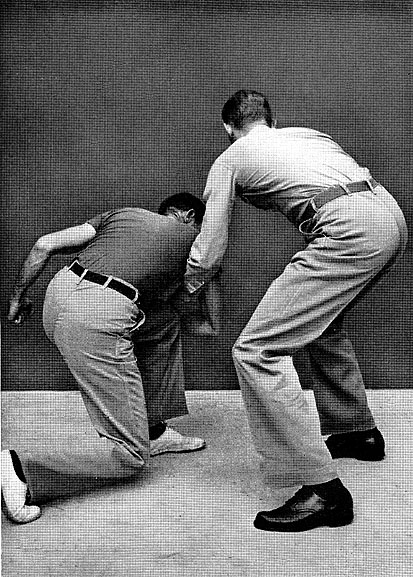
Smash down his extended arms with full, body-pivoting right and
left hooks. Force the attack by continuing to wheel back
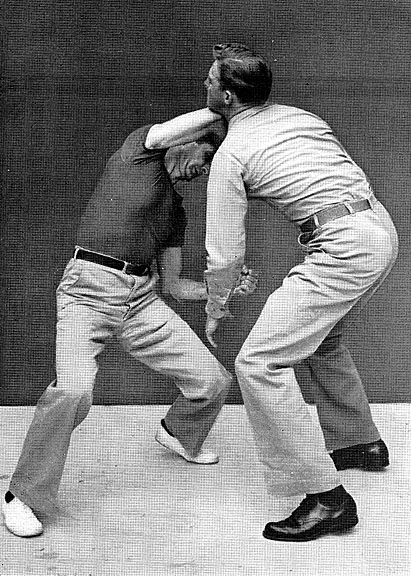
Wheel back up with right elbow back smash, directed at any target
in range. Follow through with your left fist or elbow
A smashing blow with your left elbow may leave you wheeled over
to your right side. Repeat the attack from left to right
Smash back with the left elbow or edge of left fist. Force an attack
with elbow and fist smashes by pivoting the whole body
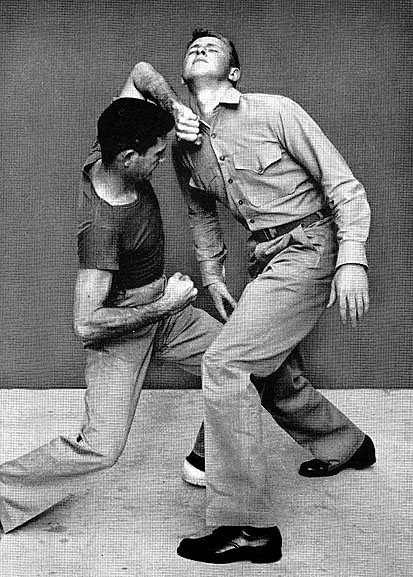
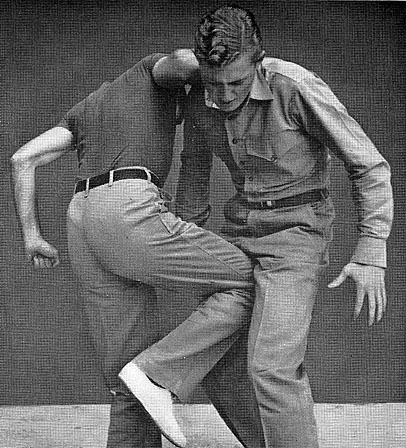
The Foot Attack
Here is your most effective long range attack. Instead of a straight
smashing thrust of the master arm, you rear BACK, shifting the weight
on the REAR FOOT, the RIGHT hand raised as if to ward off a blow.
As soon as your opponent comes within range, your FORWARD FOOT is
thrust forward at your opponent with a FULL snap. The foot, in a
HORIZONTAL position, should smash on or below your enemy's KNEE.
If his groin is unguarded, you may safely direct your kick into
this region.
Whether you hit or miss, follow through with a wheeling attack.
The arm arm you had raised before your kick mav also be used to
smash aside a dangerous blow from your opponent.
You will find that you will actually bounce when you KICK properly.
The foot whips out horizontally to its maximum range,
then whips smartly back. There will be little opportunity for your
opponent to grab your leg.
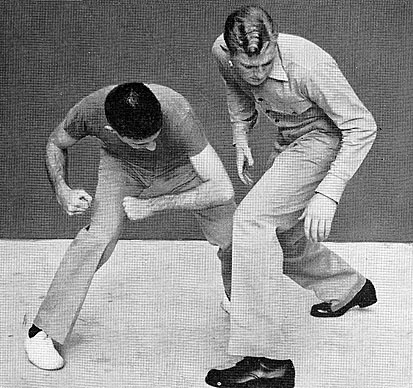
If your opponent is armed with a knife, you will find this foot
attack one of the safest and most effective ways of keeping him
away from you; if lie attempts a cut on your leg, you simply chop
his head with a backhand smash.
To stop your opponent at long range, try a foot attack. From your
guard position you will shift your weight to the left foot
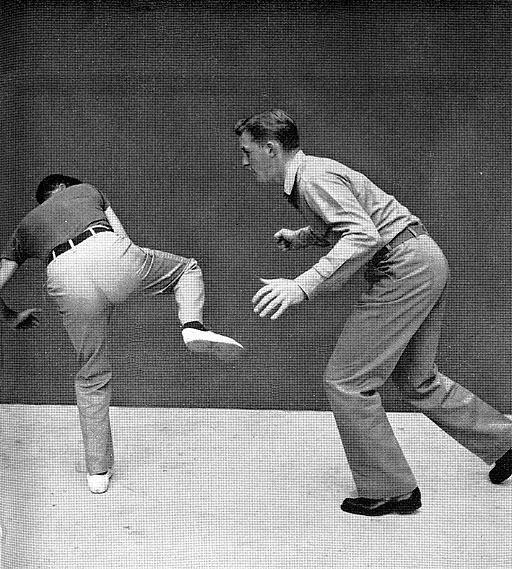
The shift of weight to the left foot removes your upper torso from
danger and frees your right foot; draw it back and kick
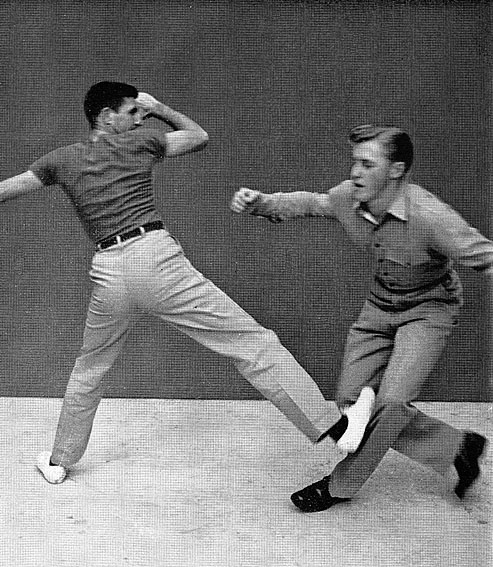
Smash your right leg out, directing the full sole of shoe into the
knee or the upper shinbone of the opponent's forward leg

Follow through with a wheeling attack if your opponent is in close
enough or smash his neck with the edge of your hand
WEAPONS
You should supplement your natural weapons with anything you can
pick up quickly to use as a missile or to hold in your hands. However,
the natural weapons, themselves, are numerous and deadly enough
when they are properly used.
Here are nature's own weapons:
The Head
The DOME of the FOREHEAD and the BACK of the HEAD are well reinforced
as protection against bumping; these areas make wonderful BATTERING
RAMS. They are used as such by the Danes. Use of the head in this
manner is termed the "Danish Kiss" when used to batter
in the face of an enemy.

If your enemy tries to grasp your neck, you can break his grip instantly
by wheeling a left or right cross over his arms
The Elbows
Those elbow bones sticking out when you bend your arms, have been
strongly reinforced since childhood. You have crawled on them, rested
on them and propped yourself up on them so often that they are tough
and hard. When smashed anywhere against an enemy's anatomy, they
can do unbelievable damage. The elbows are an effective weapon for
use against any target within their range.
As your arm crosses enemy's arms your shoulder muscle, with full
body weight behind, bears down on opponent's wrist
Full body pivot should be used with the right or left cross. The
momentum of the body and its weight will break the hold
As soon as you have broken the hold you may launch your wheeling
attack. Start your offense with a back elbow smash
The Hands
The hands themselves are loaded with a fine assortment of ammunition.
With the fingers extended and joined you have the
equivalent of a knife point, extremely effective when thrust into
vital and soft areas such as the enemy's throat.
By spreading the fingers and thrusting for his eyes
you have five small projections that can't miss the target.
For "in-fighting" use your natural battering weapons.
Cup the palm of the hand and ram it hard against the opponent's
chin
By doubling up the first two joints and thrusting, you deliver
a more powerful blow than with the fingers extended and joined.
With the finger tips thus PROTECTED, you can strike not only at
the throat but at such targets as the solar plexis, kidneys and
groin without fear of injuring the finger tips.
The edge of the hand, fingers extended and joined,
is the equivalent of an axe and is used in the same manner. You
do not necessarily have to toughen this part of the hand. It is
excellent the way it is. You have used your hands all of your life,
and that muscle on the edge of the hand is tough. Practice in the
striking of objects is, of course, good training; it will harden
the muscle and develop skill in marksmanship. Learn to strike your
target with the muscle and not with your wrist or knuckles. An axe-like
blow with the edge of hand can break a neck or rupture a kidney.
The opponent receives the full impact of the heel of the hand. With
this blow you do not endanger your knuckles or fingers
The edge of the fist. Note how hard you can pound
your fist on a table in this manner; the same blow can be delivered
on the neck or groin of an enemy.
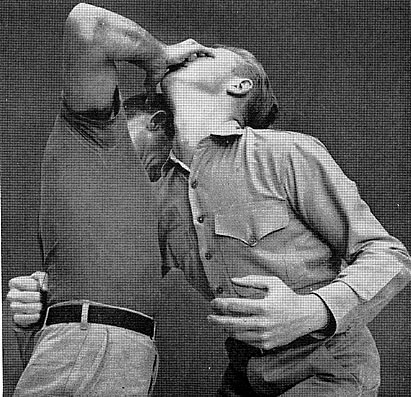
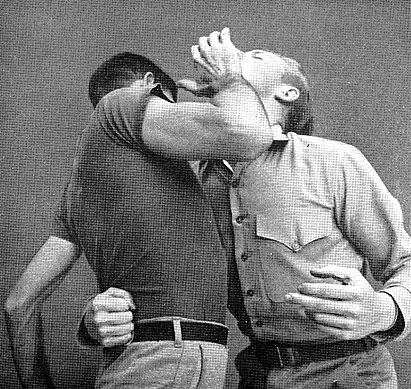
After smashing with the heel of your hand, follow through by curling
your fingers over the enemy's face and into his eyes
The heel of the hand. The wrist is locked and firm
in all attacks with the hand. This one is an exception. With the
fingers extended, bend the whole palm back in the same position
as when pushing or leaning palm first, against a wall. The palm
in this manner makes a battering ram of your forearm. The natural
seat of your palm fits perfectly under the chin of an opponent.
When in close, aim an uppercut at your opponent's solar plexis or
chest, the heel of the hand will sweep up to chin in a natural arc.
The heel of your hand, directly backed by the bones and muscles
of the forearm, will connect with the impact of a rouk. Close your
teeth and try it gently on yourself.
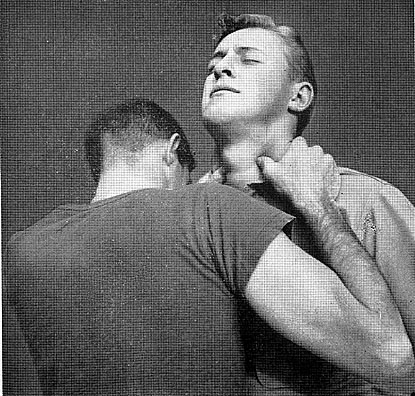
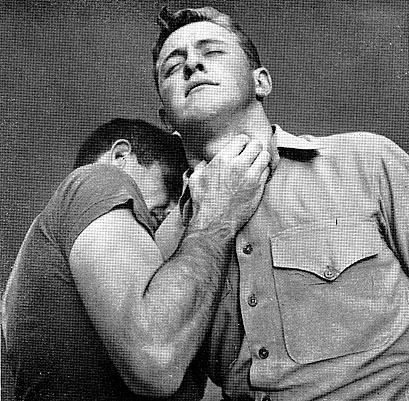
Attack your opponent's throat at the earliest opportunity. With
both hands apply thumb pressure to sides of enemy's windpipe
Thumbs and Fingers. In tight spots the individual
fingers act as probers, gouging and poking at the eyes, the bottom
of the throat and under the jawbone. The fingers and thumbs are
used for prying at the fingers of the opponent when they are clamped
somewhere on your body. Pry one of his fingers loose, clamp your
hand around it and BREAK it. The two thumbs rammed in on both sides
of the wind pipe, then snapped together, is a choice way to end
an encounter.
If only one of your hands is free, grasp the windpipe between the
fingers and thumb and press in; then snap the trap shut
The Palm. The results of a punch to your opponent's
head in the usual manner are, in many instances, not felt until
the next day, but a full resounding slap on the face or base of
the skull will rock your opponent right then and there. A good single
or double slap across one or both of his ears will drop him on the
spot.
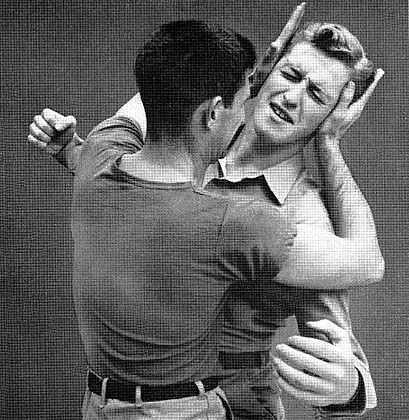
If enemy has you in front grip and both your hands are free, slam
palms over his ears. Result is like a blast concussion
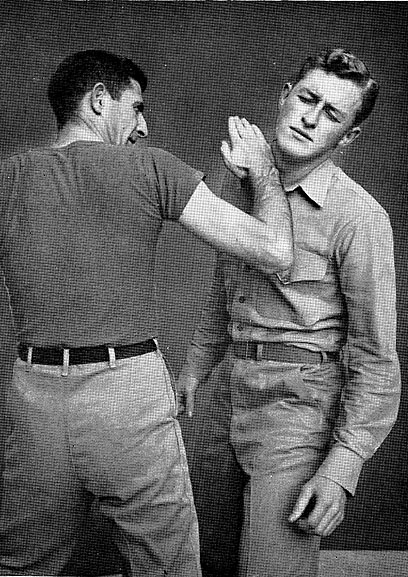
If opponent leaves himself open for blow at throat, smash at windpipe
with edge of hand. Even a light stroke can be deadly
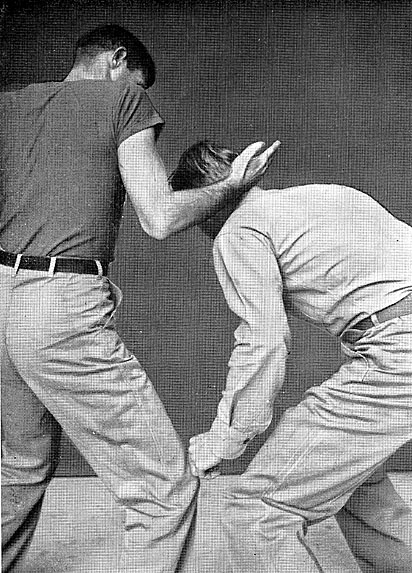
A blow at the base of the skull can break a neck. Nerves or large
veins on the sides will paralyze if they are struck hard
The Knees
Two more of nature's battering rains. Use them against the groin,
head or anything else that comes within their range. When you are
standing over a downed opponent drop your whole weight behind the
knee as it falls on some part of his anatomy.
Your knees are powerful battering rams. Use them when you have the
opportunity. Opponent's groin is a vulnerable target
The Feet
The broad length of the foot is effective when used
as a ram against the opponent's knee in your foot attack. Smash
down on his shin bone or shatter his instep if he is standing. The
point of the foot can be driven into your opponent when
it is safe to do so, especially when he is down - to the neck. cheat,
or joints. Stomp the heel down on his instep or use
it to kick backwards at his shin, knee or groin.
Notes
A small rock will add weight to your clubbing fist.
Any small item, cigarette lighter, stone,
or piec of wood will tighten the muscles on the outside
edge of the fist.
A small stick - protruding a bit, front and back -
will provide added effectiveness. A small, tightly rolled
piece of newspaper may be used instead of the stick.
TARGETS
In your initial contact with your enemy there are only two primary
targets in which you are interested. Only one well placed round,
or blow, in either the throat or the groin
will set your enemy up for FINISHING OFF. There are many other targets
that you might have to hit repeatedly, all disabling to some degree,
but generally speaking, they will be only a prelude to stunning
or blacking your opponent out with a blow or blows in one or both
of the primary targets.
The Neck
One of your opponent's primary targets is the neck. A severe blow
anywhere on the forward half of the neck will cause extreme damage
or death. If the blow is delivered at an angle with a back sweep
of the edge of the hand, the windpipe will receive a severe jolt
or fracture, and the enemy will probably CHOKE to death. A shocking
blow at the windpipe delivered in any form was termed the "Black
Death" by the late Colonel Biddle. The enemy will either pass
out immediately from the shock and pain, choke to death, or remain
standing, his face turning darker and darker as he tries unsuccessfully
to get air into his lungs. Finally he will pass out.
This angle shot at the throat can damage the vessels
which carry the blood to the enemy's head and shock the enemy into
immediate unconsciousness by paralyzing the numerous major nerves
located in that area. There is NO bone in that whole area to prevent
the blow's full effect. If you were fortunate enough to hit so hard
from the front, or the back, that you damaged the only bone in the
neck, fine. You have finished your job; you have broken his neck.
Attack the front neck area with hand thrusts straight
in, finger thrusts, edge-of-hand smashes, (both hands) fist smashes
and elbow smashes. Attack the back of the neck with fist and edge-of-hand
smashes.
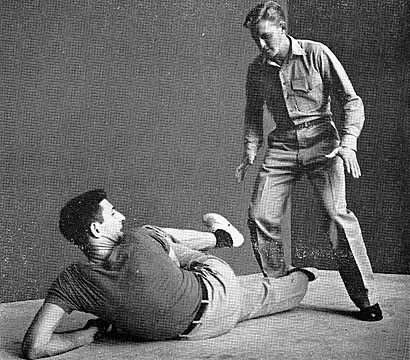
If you are on the ground and the enemy advances, hook one foot behind
his ankle and smash his shin with your other foot
Groin
Attack your opponent in this area with everything you have; but
remember that this is the ONE AREA a man does not have to be TAUGHT
to protect. He will instinctively make it very difficult for you
to get in a good blow, especially if you try to attack this area
by kicking. Don't try a kick at his groin unless you are VERY sure
it is unprotected.
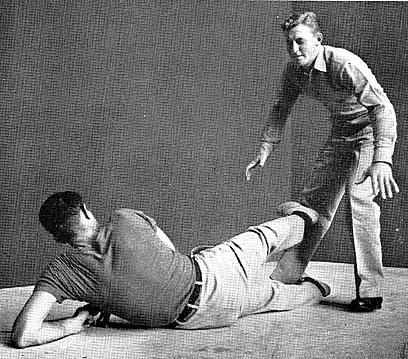
Coordination of the two feet is very important; the lower foot hooks
ankle at the same time that the other foot smashes out
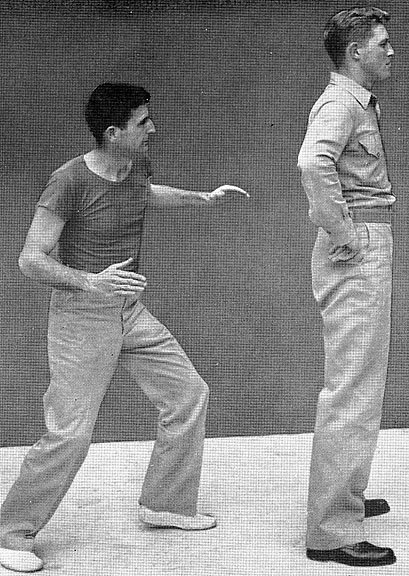
In an attack from the rear, make approach with left forearm ready
for whipping blow across the front of opponent's throat
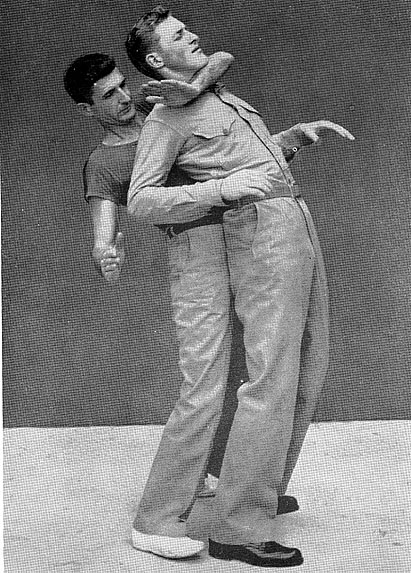
Snap forearm hard on enemy's windpipe. Right arm is ready to lock
left forearm in place. Force his midsection forward

Whip right arm under left palm, snap right palm under base of enemy's
skull. Lock your muscles in arms, back and chest
The Head
Attack the head with elbow smashes, fist smashes, or a heel-of-hand
smash to the chin. Hook your hand behind his head and snap his head
forward and come up with a knee smash to his face. When the back
of his head is available, smash the edge of the fist or the open
edge of the hand across the BASE of the skull. If he is in too close,
curl all four fingers into the region of his eyes and start pushing.
To force a man to release his grip on you, ram two fingers up into
his nostrils and push his nose upward. Your antagonist SHOULD let
go!
Rib Cage
When you attack, close in and start your smashing action with elbows,
fists and knees; use the head and feet if you can. When your elbows
smash against the rib cage ANYWHERE they can inflict severe damage.
If you connect around the lower ribs in the front, you will jar
the solar plexis nerves. A blow in the lower ribs on the RIGHT SIDE
will jar the liver. If you strike the lower ribs in the BACK you
will be injuring the kidneys. The whole rib cage is packed with
organs and ALL of them will be affected by a severely concentrated
blow which lands ANYWHERE in that area. A punch driven into the
upper stomach region directly under the center of the chest, will
drop your opponent hard and fast. After he drops, a few well placed
kicks or stomps or a knee drop in that lower rib area will finish
him.
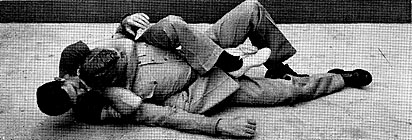
Force the left forearm against enemy's front throat area and as
you drop to ground wrap your legs around his midsection
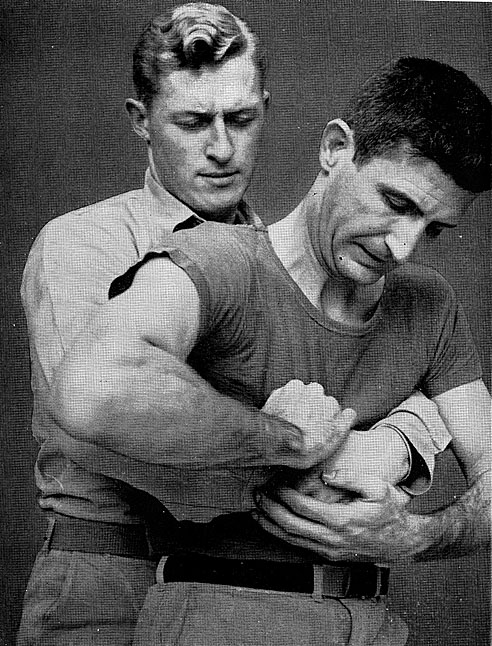
If your opponent gets a bear hug on you from rear and both of your
arms are tree, grope for an exposed finger or thumb
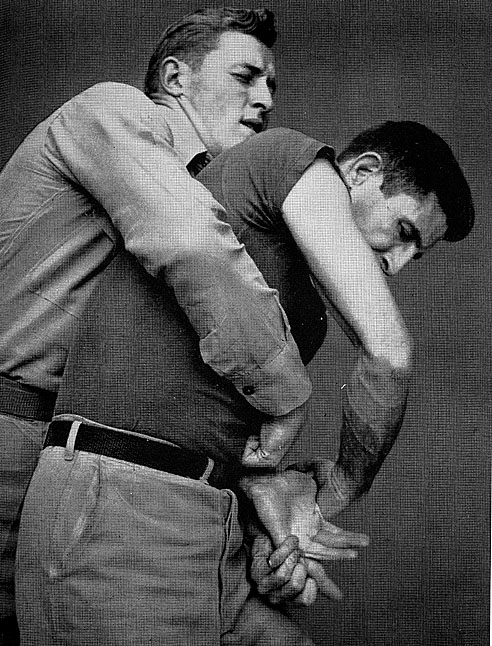
When you find the finger or thumb, peel it free and be opposition
to the joint. If you loosen two, spread them apart
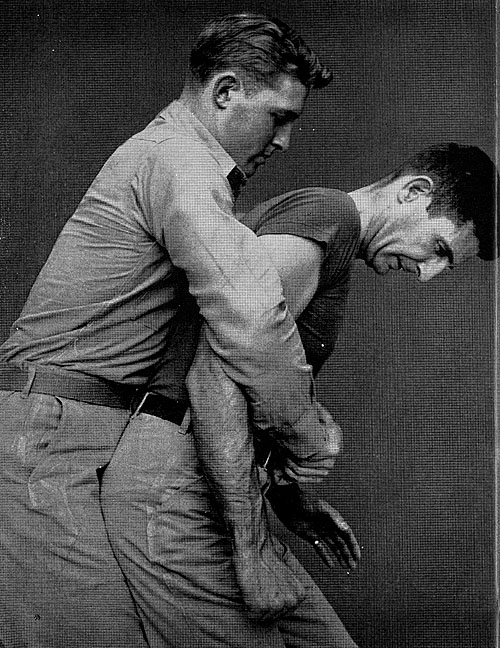
If your arms are pinned down in a bear hug, arch the back, bend
forward and apply pressure to your enemy's midsection

When you release the pressure suddenly you will be creatingr a gap
wide enough for you to smash uour fists into his groin
The Joints
All of the moving parts on the meim can be placed in one category.
If they are small enough to break with your hands, break them. If
your opponent gets his hands on you. find one of his fingers and
break it by wrapping five of yours around it and bending it in a
direction nature did not intend. Larger joints should be attacked
with blows. Slam your heel or foot down on his instep or kick at
his knee cap until he is down. Then stomp and kick the moving parts.
The ankle, knee, fingers, wrist, elbow and. of course, the neck
are good stomping grounds. A KNEE DROP in lieu of the kick for the
neck joint wifl leave you out of danger as far as that one enemy
is concerned.
Large Muscles
Smash with fists, knuckles, toe kicks and stomps. A good blow "ill
incapacitate the forearms, biceps, calves and thighs.
CONFIDENCE in yourself - the self assurance that you CAN DO IT -
is the first requisite: the rest is a matter of KNOW-HOW and PRACTICE.
This confidence will allow you to stay LOOSE, mentally and physically,
until the moment which necessitates the application of your chosen
plan of attack. Then HIT FAST and HARD, pressing
the attack to itssuccessful conclusion.
The Stick
Years ago the cop who walked his beat, swinging his night stick,
knew that it was fine for clobbering drunks and thieves on the head,
but it is doubtful whether he realized the versatility of that short
length of hard wood he carried. Today, however, there are a number
of effective, fighting tricks with sticks. The uses of the stick
are worth passing on to you because sometime it may become necessary
for you to defend your life with nothing more than your natural
weapons and any stout stick you might be able to pick up.
The list of common articles, usually available and easily adapted
for use as "sticks", is limitless. Swagger sticks, broken
broomsticks, mops and shovel handles, snapped-off billiard cues,
rungs of chairs or shon branches of trees. Ladies in the subways
will find a short umbrella or a rolled-up magazine equally effective.
THE SHORT END TECHNIQUE
For the most part, the development of this short end
technique must be credited to Colonel William A. Kengla, USMC.
Pick up your "stick," whatever it may be, and we'll show
you how much damage you can do with it. If you're at home, pull
a towel rack off the wall; if you're in jail, pull a bar out of
the window. ANYTHING long, stout, hard, about 22 inches in length
will do.
Go it?
Good. Here's how you'll hold it:
The Grip
Grab it just as you would a KNIFE. The fingers are wrapped se-curely
around it, allowing approximately three inches of the stick to protrude
OUT IN FRONT of your hand. The remainder of the stick lies along
the forearm, forming a straight line from the point to the elbow.
Now allow the long end of the stick to drop by your side.
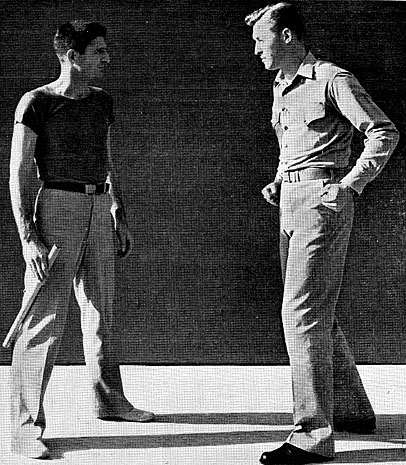
The short end technique. Grasp your stick about three inches below
the forward end; the body must be very well balanced
The Stance
Your stance may be either that of the boxer (left foot forward)
or that of the knife fighter (right foot forward). However, the
left foot forward, stick in the right hand, is recommended for most
situations.
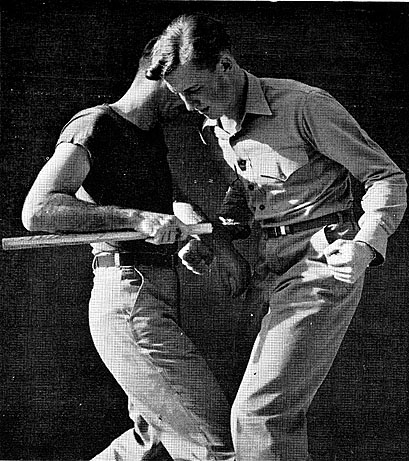
The attack. Your stick performs a piston-like motion as it is whipped
up along the forearm and thrust into exposed target
The Attack
ANY ONE of the blows described here will be decisive if planted
properly in a vital target area. Your choice of attack will depend
upon the situation.
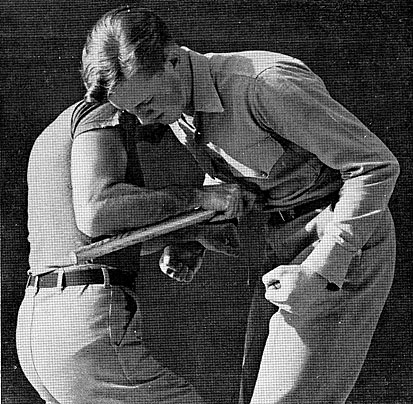
The opponent's solar plexis is your target. The impact is on end
of your stick, backed by power of full arm and shoulder
THE SOLAR PLEXIS BLOW is delivered from the boxer's stance, your
stick cocked against your forearm, your LEFT foot forward. With
a driving, piston-like action of the stick arm, you smash the stick
directly into the solar plexis of your opponent. The blow is carried
in with additional force by advancing the right foot as you strike.
If you CONNECTED, you have succeeded in discouraging your opponent
and he will show no more interest in the fight.
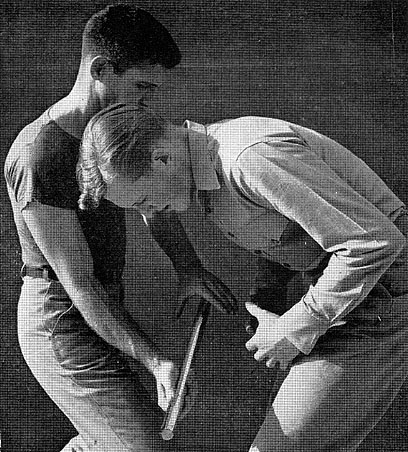
Your stick will form a bar in a split second if you whip it to the
left and into your left hand with a simple wrist movement
However, if you missed or if youi blow was blocked, FOLLOW THROUGH
by WHIPPING the LONG END of the stick over to your left side with
a single movement of the WRIST. Your LEFT HAND, PALM DOWN, should
be ready to receive. Your stick is now a HORIZONTAL BAR, gripped
in both hands and held at a midsection level.
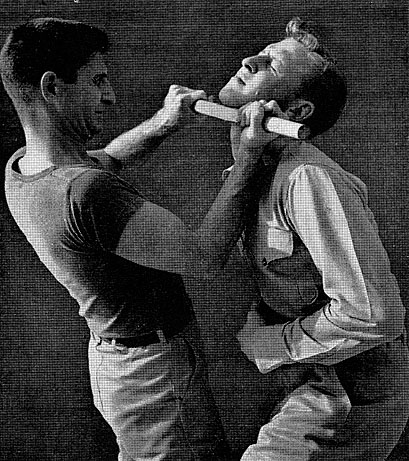
The bar is smashed up under chin with the full power of the arms
and shoulders. Complete smash with full follow through
DRIVE the bar up UNDER THE CHIN of your opponent. All right, so
you missed on the way up-SMASH IT ACROSS THE BRIDGE of his nose
ON THE WAY D0WN. Draw it back to yourself and smash it straight
to his nose, teeth or throat. If your opponent is still obstinate,
MOVE IN.
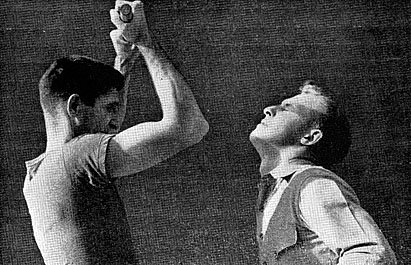
If you missed or merely grazed the chin, leaving bar over opponent's
head, you are in a position to continue the attack
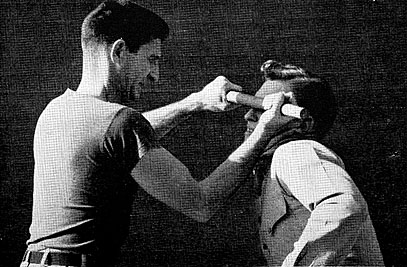
Follow through with a sweeping downward smash. Bring the bar crashing
down on enemy's nose if his face is turned up
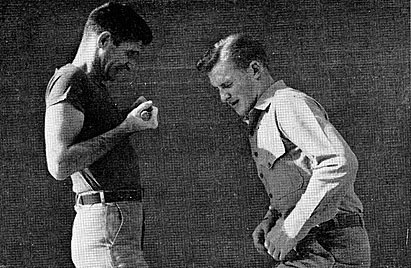
Bring bar back, close to chest, and prepare for direct smash
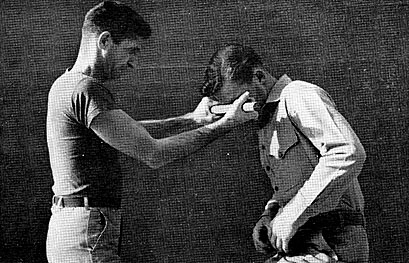
Bar is smashed into enemy's throat, or head between the eyes
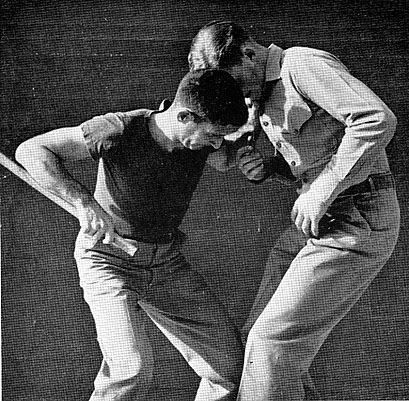
Grab enemy's shirt and return your stick to forearm position
To MOVE IN, release the left side of the stick and bring it back,
along the forearm, into its original position. Now, with your FREE
LEFT HAND GRAB A SOLID HUNK OF YOUR OPPONENT'S CLOTHING, somewhere
around his right shoulder area and pull him in close. From
now on, wherever he goes, you go! Start smashing with the
SHORT END of the stick - duck low and drive it into his groin, solar
plexis or rib area. Strike ANYWHERE, let him have it under the chin
if you can get there with it.
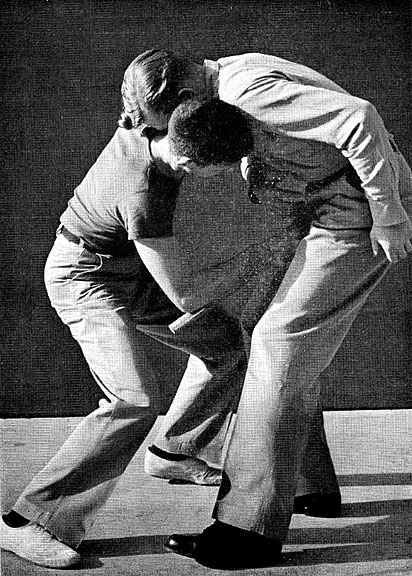
Crouch low; smash the small end of stick up to enemy's groin

If the groin attack misses, try for your enemy's solar plexis
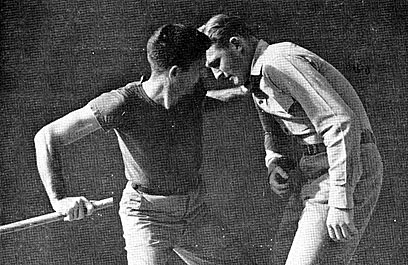
If you are attacked from the rear while engaging an enemy, drive
the long end of your stick straight back at the offender
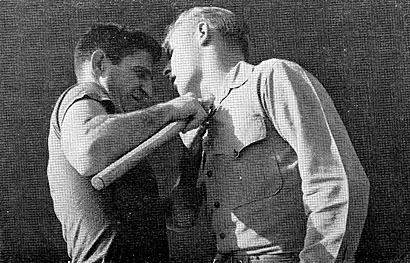
Direct short end of stick to opponent's neck, jaw or temple. Anywhere
the weapon lands will be a painfully damaged spot
If he is blocking your targets, start swinging around the OUTSIDE.
Try for his temple, ear, jaw or side of the neck; try for a blow
in his lower rib section. ANYWHERE your point lands will be a painfully
damaged spot. And a lot of sore spots add up to ONE BIG PAIN. And
a painfully bruised body offers LESS RESISTANCE.
Now, you may wish to resort to a PIVOT PUNCH. This outlawed boxing
blow is delivered like a right hook to the opponent's jaw, but the
piiint of the elbow, rather than the fist, contacts the target.
The upper arm, shoulder to elbow, is too short to deliver this blow
effectively without accompanying the blow with a wheeling
body movement.
The stick is kept along the arm, protecting your elbow as it smashes
across your opponent's head after your right hook swing.
When you deliver this blow, put plenty of "WHEELING BODY"
behind it DON'T PULL YOUR PUNCH!
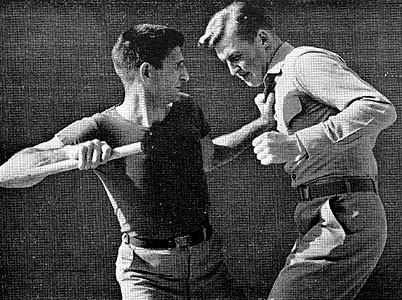
For the pivot punch, bring the long end of the stick securely along
the forearm. Stick will protect your elbow as it strikes
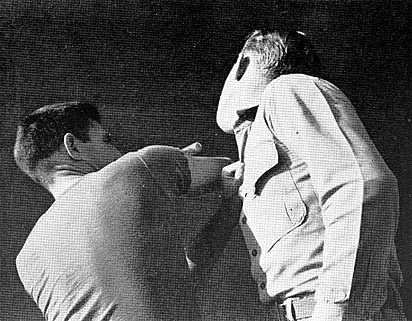
Pivot the body and apply a right elbow smash to enemy's jaw
All right, you missed again. Your blow failed to drop your opponent.
Don't worry, you are now in a position to back smash with your right
elbow. Make a HOOK with your stick by a slight movement of the wrist;
come back across, hooking your opponent's neck with the stick. YOUR
LEFT HAND SHOOTS ACROSS IN FRONT OF YOUR OPPONENT, GRABBING THE
LONG END OF THE STICK.
This is it, Mac, now you've got it made! Your opponent's neck is
now uncomfortably nestled in the DEATH TRIANGLE. The stick behind
his neck forms one side, your CROSSED arms on his throat are the
other Hvo sides. SNAP THE TRIANGLE SHUT AND SQUEEZE!
Incidentally, this triangle treatment is excellent for curing enemy
sentries who have "shouting sickness." You will find that
it is a neat, silent way of dropping the sentry from behind. The
triangle is simply reversed-the stick flashes in FRONT across his
throat, your arms cross on the BACK of his neck. Squeeze until you
feel his windpipe close; he can be revived! To kill, squeeze hard!
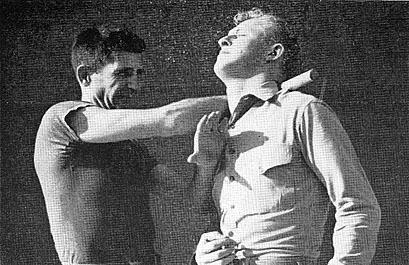
Follow through. Hook is formed with stick around his neck
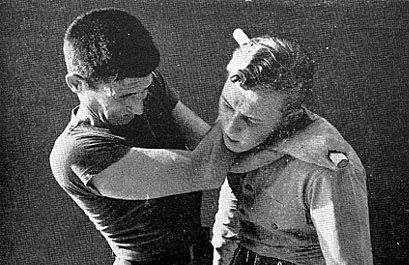
Arms cross; other end of stick is secured. Snap triangle shut
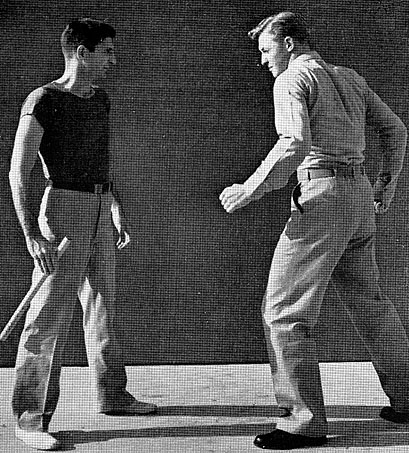
From this stance you are in a position to attack your enemy with
the short end of the stick or whip it into a bar instantly
To block a kick, whip the long end ol the stick across to your
left hand. It has again become a horizontal bar, but instead of
bringing it up to his chin, snap the arms straight down at the oncoming
leg. Aim for the shinbone if possible; then follow up with a chin
smash since the stick is in a position for this movement.

If your opponent attempts to kick, snap your stick over into the
bar position. Your feet firmly placed; body well balanced
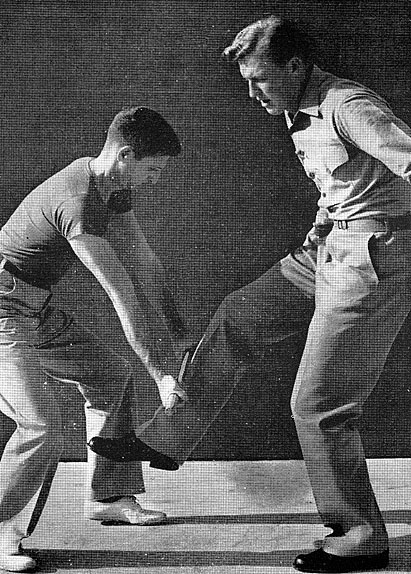
Snap your arms straight, directing your bar to the shin of opponent's
raised leg; lock arms against power of his kick
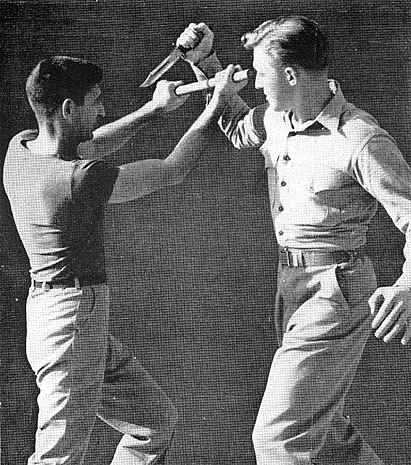
Smash your arms out straight against a downswinging blow. Make use
of your feet or knees against any exposed target
Your opponent's overhand or underhand blows may be blocked in this
same manner. Smash straight out for the descending arm, or bash
aside the upcoming arm. FOLLOW THROUGH AT ANY TARGET OPENING.
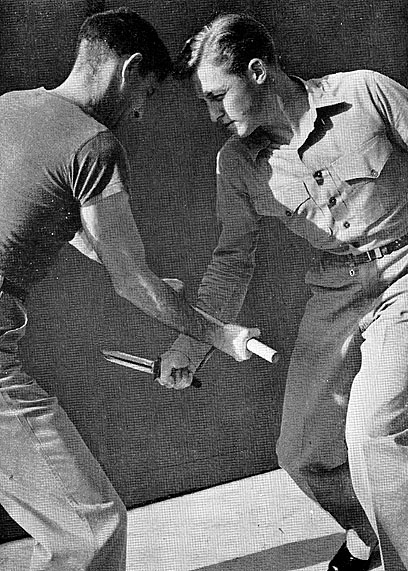
If your opponent tries an upswinging blow, direct your bar straight
for his wrist or forearm. Draw trunk out of range

At the completion of any block with your bar, follow through immediately
with a smash to enemy's forehead, chin or throat
THE LONG END TECHNIQUE
Fundamentally, this technique is the use of the stick in the same
way you would use a knife.
The Grip
Grasp the stick a few inches from the BACK. This protrusion is
a reserve for clubbing in close or smashing back at
an opponent who may attack you from the rear. The LONG END of the
stick is out in front - held out like a knife. The point and the
elbow form a STRAIGHT LINE.
The Stance
In COMBAT use the knife fighter's stance. Keep the
point directed at your opponent and thrust the same way as in knife
fighting.
The Targets
Thrust for the throat, face and solar plexis.
The Attack
In combat, if you are otherwise unarmed, find a club and sharpen
both ends with a rock. Since you have no cutting edge, direct the
whipping action of the club to your opponent's temple, neck. shoulders,
joints and muscles. Use the point in full thrusts.
In attacks, from the long end technique, a bar may
also be formed with a movement of the RIGHT WRIST. Unlike the RIGHT
hand grasp used in the short end technique where the
RIGHT KNUCKLES are DOWN - the fingers UP - the bar formed from the
long end stance will have the knuckles on BOTH hands UP.
The bar may be used to smash or the stick may be whipped from either
end by releasing the grasp of either hand.
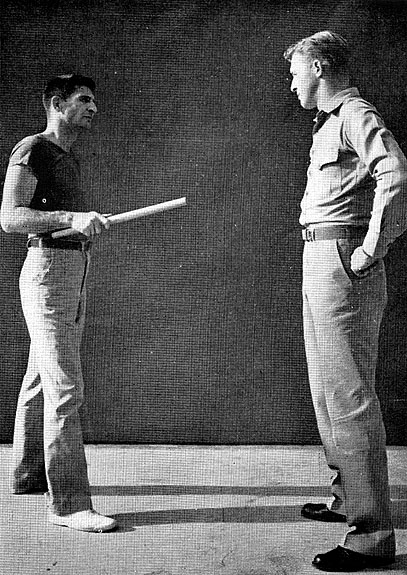
The long end technique. Extended long portion is directed at your
opponent. Grasp stick about three inches from the end
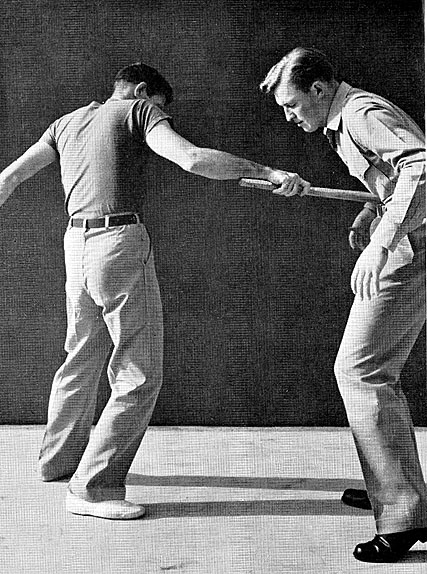
Thrust the point of the stick into your enemy's solar plexis. Your
left arm whips back, adding power and velocity to blow
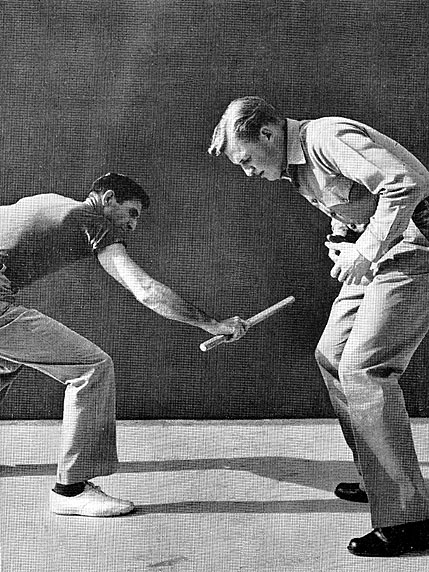
Slash with the long end of your stick in the same manner in which
a sabre is used, striking at enemy's joints and muscles

The stick is readily converted to the bar position by flicking long
end over to the other hand with a simple wrist movement
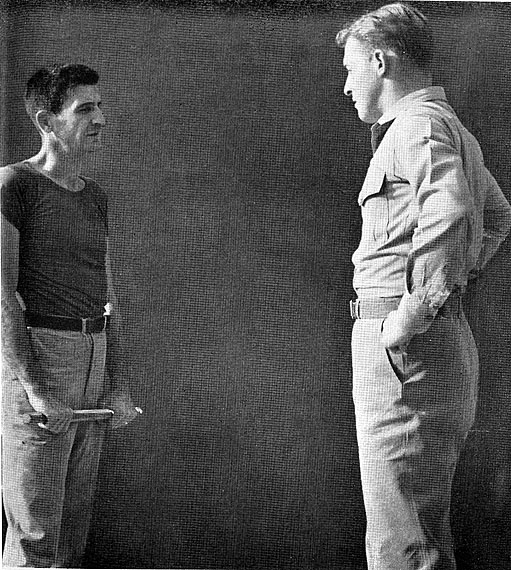
When you assume this position with your bar, you are in an effective
non-aggressive stance, but bar is ready for action
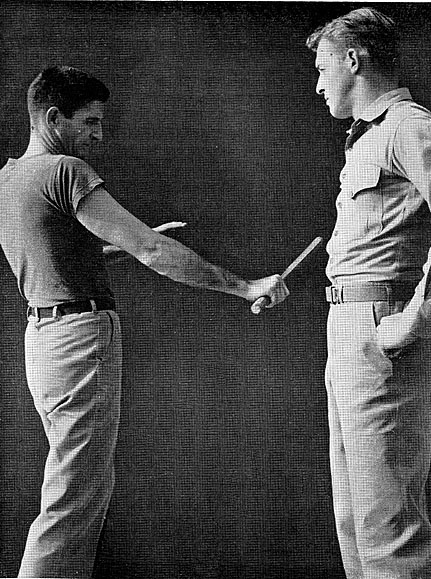
To strike for an exposed target on the opponent's right side, release
the grip of your left hand and strike with your right
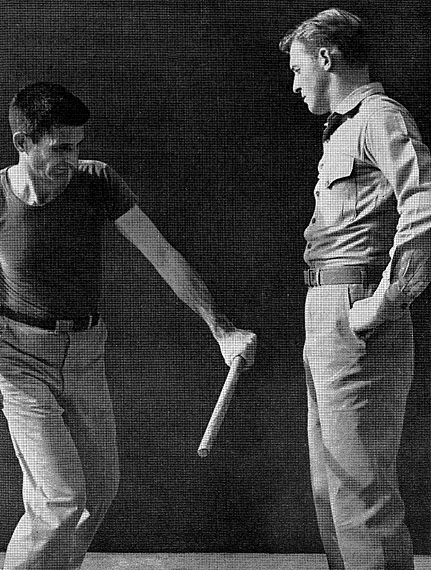
To strike at a target on the opponent's left side, release the right
hand and smash across, holding your stick with the left
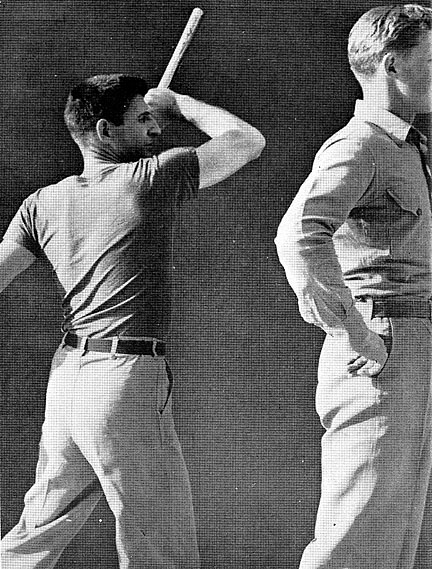
To attack an enemy from the rear, form hook with the stick and your
arm. Whip the stick across front of enemy's throat
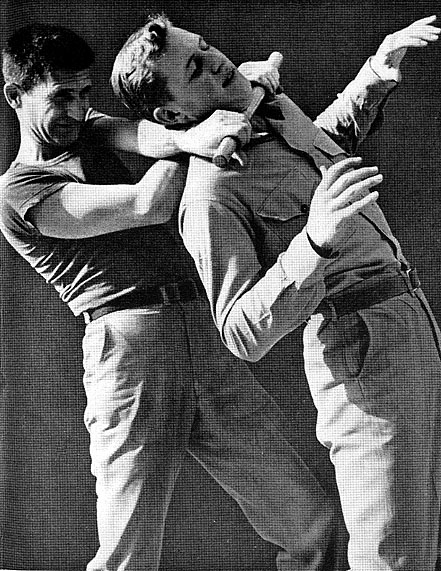
Cross your right arm with your left and grasp the stick with your
left hand. Then snap triangle shut and apply pressure

The Come-along. Whip the stick between the legs of offender and
turn it across his thighs. Grab his collar, lift and push
POLICE WORK
While on police duty, you may wish to assume a NON-AGGRESSIVE stance
with the stick. Either the SHORT STICK or LONG STICK technique may
be used. To achieve a non-aggressive stance with the short stick,
grasp it about three inches from the front, allowing the remainder
to hang down, pointing to the ground. The short end is now pointing
upwards; the fingers grip the stick firmly; the thumb is on the
inside, next to the thigh.
This position has an innocent appearance which will enable you to
come in close to your suspect without arousing suspicion from him,
yet you are in constant readiness to whip the stick up, alongside
vour forearm to the elbow, and ram its SHORT end directly into the
mid-section of your suspect if he becomes aggressive. Follow through
with your attack as previously prescribed. BUT USE ONLY AS MUCH
FORCE AS THE AGGRESSIVENESS OF YOUR SUSPECT DEMANDS.
When you "escort" an offender through a crowd vou may
wish to move behind-him. To move him RAPIDLY and with VERY LITTLE
resistance, grasp your stick in the middle; insert it, end first,
between his legs and turn the whole stick so that it crosses his
thighs; then move it UPWARDS. At the same time grasp the back of
his collar with the free hand and PUSH FORWARD. In this manner you
will be able to carry him along on his tip toes and completely off
balance. This technique is very effective for quick, short trips
from curb to wagon or from bar to street.
The use of the stick as a horizontal bar is an excellent technique
for the law enforcement officer. He may take his stance in a relaxed
manner, his stick horizontal, without conveying the obvious intention
of a club raised in a striking pose. YET HE IS IN READINESS TO STRIKE
instantly at the offender's hand, forearm, elbow, knee cap or shinbone.
The advantage of this technique is the opponent's uncertainty about
the direction from which the blow will come. The officer may release
either hand and strike with the other. He will do this without premeditation,
making his attack without any indication of the side from which
it will come.
But whether you're a cop on a beat, a guy walking home from a date
late at night, or a mud-sloshin' infantry man, if you're weaponless
except for a "stick", these few tips will have given you
something to rely on in case of an unforeseen attack. The stick
is a versatile weapon and its technique rises far above the common
thought of bashing in your opponent's head.
And that's a good defense, too.
Knife Throwing
Only a few of the local boys around Times Square noticed that something
was missing. The lights on the Palace Theater sign had gone out.
Backstage, the old doorman paused for a last, wistful glance at
the darkened house; then he picked up his coat and shuffled through
the stage door, locked it for the last time, and stepped sadly into
the alley. The Palace had closed; vaudeville had died.
The years which followed left only memories of the acrobats, the
ventriloquists, the jugglers, the wire-walkers. But those who mourned
vaudeville seldom mentioned one of its most gasp-provoking acts
- The Knife Thrower.
The closing of the Palace had been a symbol, it had meant the end
of one night stands and split-weeks in the provinces; it had meant
that a lot of little boys wouldn't go to bed nights, dreaming about
a new ambition - to become knife throwers.
The fascinating desire to throw a pointed knife across a room and
make it stick in a solid surface is a natural inclination, but this
urge was always stimulated by the glamourous knife throwing act:
a roll on the drums, colored spotlights, glistening blades flying
through the air, outlining a pert lass in a spangled costume posing
against a wooden backdrop. The man in the satin shirt never missed;
every knife he threw pingg..ged into the board point-first - and
stayed there!
Ever wonder how he did it?
Well, here are the practical principles based on the science of
professional knife throwing:
THE END-OVER-END METHOD
The END-OVER-END METHOD, used by the professional knife thrower,
is the most accurate of the three knife throwing techniques; gratifying
results may be obtained quickly and safely by observing its easily
mastered principles.
The Grip
Raise the right forearm until it is parallel to the ground. Make
a natural fist with the knuckles UP. Now place the
knife VERTICALLY between the thumb and forefinger. If the knife
has only one full cutting edge, this edge should face FORWARD.
Straighten the forefinger, vertically, along the right side of the
blade and adjust the knife up or down with your left hand until
the tip of your right forefinger is even with the point of the blade.
Clamp the blade tightly against the forefinger with the thumb.
Your blade is now VERTICAL tu the FOREARM; well secured in a UNIFORM
manner, and you are ready for the throw.
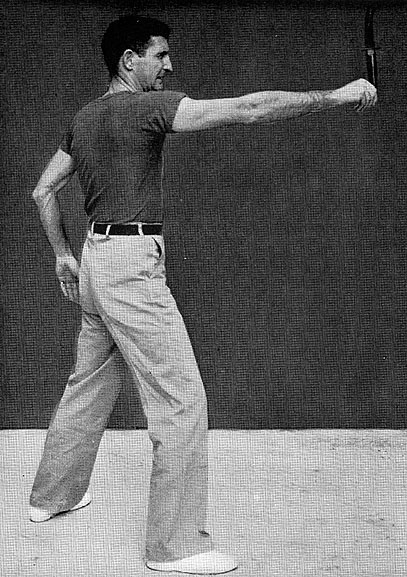
The end-over-end technique. Line up the knife on the target. Your
arm is extended fully and your blade is held vertically
The Throw
From a pistol shooter's position, RIGHT FOOT FORWARD extend the
RIGHT ARM, full length in the direction of the target. Be sure that
the knuckles are UP; the blade is VERTICAL; the wrist is STRAIGHT
and LOCKED. From this position draw the lilade back to the right
side of your head. Do NOT develop a BEND IN THE WRIST or in any
way change the position of the knife in your hand
You now have LOADED your weapon, COCKED it, and are ready to FIRE.
Thrust the right arm out, STRAIGHT AT THE TARGET, allowin-the blade
to leave the hand BY ITSELF. This action is FAST, consequently natural
errors can bring about early disappointing results. The following
instructions will help to prevent or correct
these errors
When you thrust your arm at the target, be sure that you are making
a FULL THRUST. Do NOT try to apply any WRIST ACTION to "help
the blade." The arm when fully extended will stop abruptly,
causing a natural whipping action of the FIST. This
action plus the WEIGHT of the blade, will make the blade leave the
hand in a uniform manner EVERY TIME if it is unassisted
by anything other than VELOCITY.
The foregoing instructions should give you consistent results within
the first five minutes of practice, provided of course, that you
are throwing from the correct distance. When you find
this correct range, put a marker on the ground as a guide. Later,
with practice, you will SEE the proper range of ANY TARGET, and
you will be able to adjust your throws accordingly.
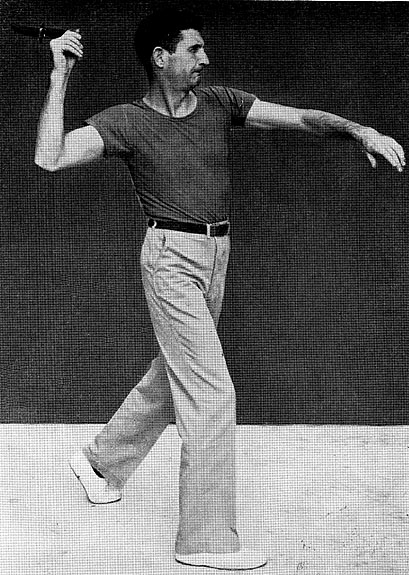
Draw your knife well back and keep the wrist straight. Your forefinger
should be pressed firmly against the side of blade
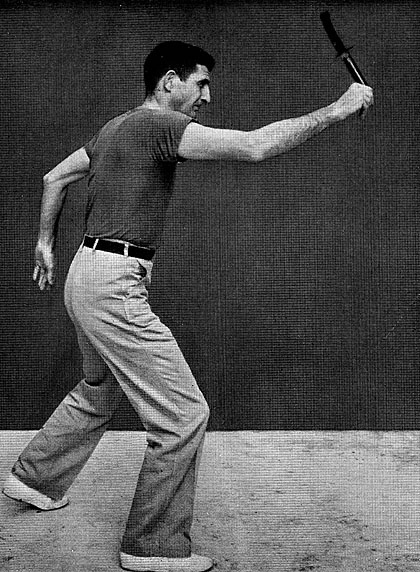
Thrust your knife arm vigorously straight forward to target. Note
that the blade remains at a right angle to the forearm
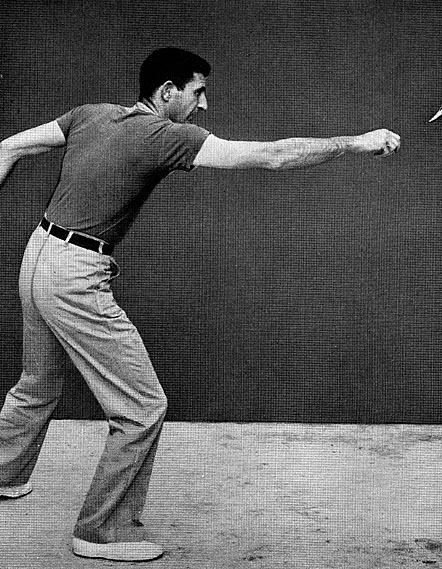
When your arm is fully extended in your thrust, knife leaves your
hand automatically. A wrist snap might result in a miss
Your Guide For Distance
If you are using a blade with an overall length (including handle)
of approximately 12 inches, you will stand about six feet from your
target. If the blade is longer, step back a few inches. At this
range, your blade will revolve three-quarters of a full turn from
the time it leaves your hand until it strikes the target.
If, after a few perfect throws, the handle of your knife strikes
the target in a downward position, you are TOO CLOSE. Move back
a few inches.
If your knife consistently strikes the target with its handle facing
UP, you are TOO FAR from your target. Move in a few inches.
If you throw according to these instructions you will gain consistent
accuracy, your blade entering the target perfectly each time, and
you will be controlling the handle well at short range.
After mastering this range, you may wish to double the distance,
ADDING ABOUT ONE FOOT to take care of the ADDITIONAL quarter of
a turn. Do NOT advance to this range until you are capable of controlling
the handle angle with ease at the shorter range.
You need NOT have a professional "balanced" throwing knife
to achieve satisfactory results; with this technique you can throw
practically anything that has a point. Although thrown in the manner
prescribed on these pages, such items as ice picks, bayonets or
letter openers will ea"h demand their proper range.
A balanced throwing knife can be compared to match ammunition, but
ANY knife can be thrown with moderately accurate results.
THE POINT-FIRST METHOD
Unlike the theatrical knife thrower, the early frontiersmen and
gamblers'of the gold rush era threw their knives POINT-FIRST. This
method is very effective at close range and the EXACT RANGE is unimportant
because the knife does not TURN after it leaves the hand.
The Grip
Raise your right forearm until it is parallel with the ground.
The fingers are extended and joined, THE PALM UP, the wrist STRAIGHT.
Now place the handle of the blade in the palm of the hand, the point
of the blade ON A LINE with the elbow. The handle rests in the palm,
forming an extension to the forearm.
Without disturbing this line-up, secure the knife in this position
with the THUMB. Merely move your thumb over to the handle and press.
You are now ready for the throw.
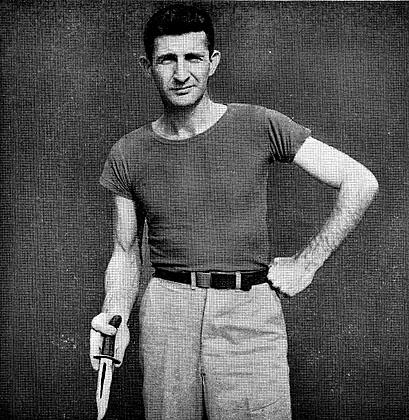
The point first technique. The knife lies in the palm of your hand,
the thumb hooked on the handle, keeping knife in place
The Throw
From a LEFT FOOT FORWARD position, draw the knife WELL BACK. Be
very careful that you do not upset the ALIGNMENT or the STRAIGHT
WRIST. You are now ready to RIFLE the blade to the target with a
forward whip of the forearm. SNAP the forearm forward in a direct
line to the target, channeling the blade to the target without WHIPPING
the FINGERS or the WRIST.
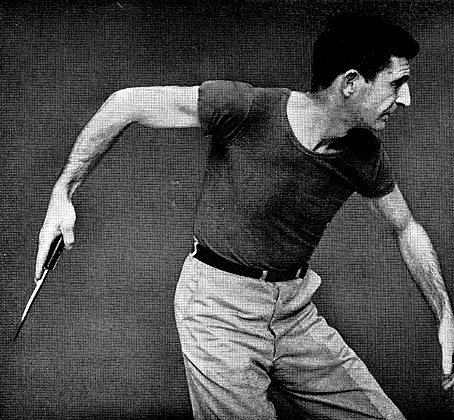
Keep your wrist straight as you draw your knife well back. Elbow
and the point of your knife should form a straight line
ALLOW THE BLADE TO LEAVE THE HAND BY ITSELF.
Eventually, after a little practice, you will be able automatically
to release the thumb pressure at exactly the right moment. Don't
try to SHOVEL the forearm straight out from TOO HIGH A LEVEL. This
will cut down your velocity. The proper level to obtain maximum
results will be approximately eight inches below the belt line.
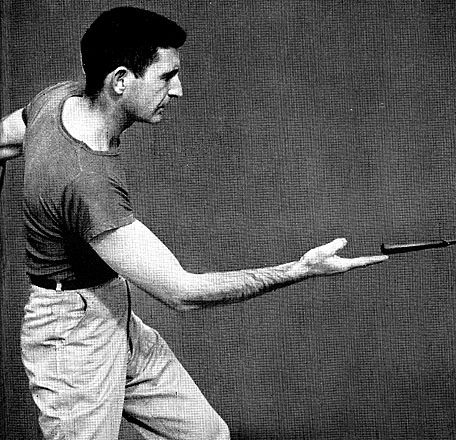
Your blade is rifled forward in a straight line to the target by
the knife hand. Your wrist and fingers should remain firm
DON'T try to draw the forearm straight back horizontal to the ground,
and PUSH forward. When drawing the blade well back for the throw,
it should be poised about 12 inches behind you, or your right side,
your forearm and blade, point down, almost vertical to the ground.
From this position you RIFLE the blade straight to the target WITH
NO FINGER OR WRIST ACTION. When completing the throw, follow
through with your arm. In whipping the blade forward your
forearm will not be horizontal until the last moment. This fellow-through
is very helpful in controlling the course of your blade.
Practice
Start your practice throws VERY CLOSE to the target.
If your point shoots UPWARDS, striking with the handle DOWN, you
have either WHIPPED with your FINGERS OR WRIST, or you have released
the blade TOO LATE.
If your blade strikes with the handle UP, you have released the
blade TOO SOON.
If your blade strikes with the handle RIGHT OR LEFT, it is possible
that your blade was NOT in a STRAIGHT LINE with your forearm in
the beginning.
A HEAVY blade is preferable for this technique; light blades respond
too easily to any error you might make.
The blade for POINT FIRST throwing should have a smooth handle.
Knobs or other irregularities will hinder uniform throwing.
There are no minimum or maximum ranges for this technique. Your
primary object is to make the blade fly through the air STRAIGHT
- and with VELOCITY.
When you have mastered "sticking" the blade at a given
range, you will be able to detect and correct your errors by MOVING
BACK BEYOND your effective range. At greater range, slight errors
become more obvious.
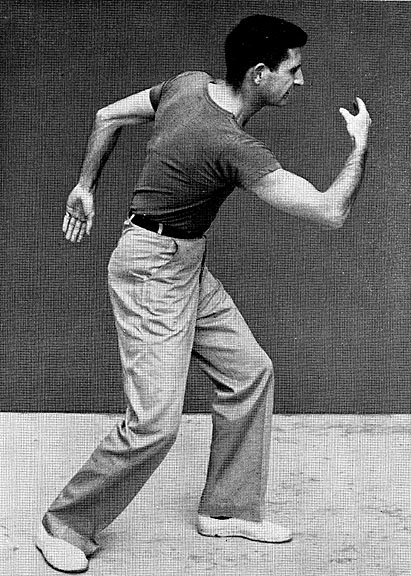
The knife leaves the hand horizontally. Any attempt to guide your
knife with a wrist action is likely to foul your accuracy
THE OVERHAND METHOD
THE GREATEST VELOCITY will be obtained from this technique. The
knife shown in the illustrations has completely pierced a truck
body and penetrated a one-inch oak panel when thrown at its natural,
range, approximately 12 feet.
The Grip
Grasp your knife with the right hand as you would for a knife fight,
and throw it from this grip - the fingers wrapped around the handle,
the thumb on top, THE SABRE HOLD.

The overhand method. The knife is held by its handle with the fingers
wrapped tightly; thumb is placed on top of the handle
The Throw
With your LEFT foot forward, merely throw the knife as you would
a baseball, following through with a right step forward and a full
natural swing. Unlike the baseball throw, you will add no intentional
WHIP. In this technique you will adjust the knife and your DISTANCE
to conform with your own NATURAL throw.
If you fail to achieve consistency at your natural range, it is
likely that you are adding an unnecessary wrist snap. If you have
a NATURAL WRIST SNAP it will be included in your natural throw and
will give you no trouble.
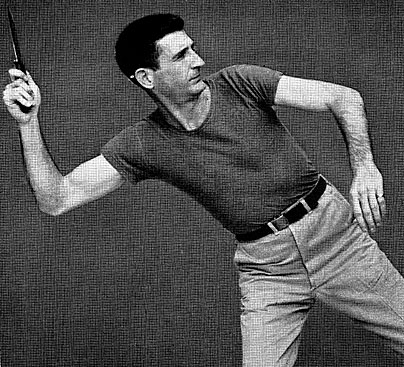
The wind-up and position are identical to the baseball throw. Full
power and velocity are obtained in this throwing method
The handle should slip out of your hand smoothly, the blade making
ONE FULL TURN in the air. The 12-inch knife shown in the illustrations
will make one tui ci i strike point first at a 12-foot range when
thrown by the author. This same blade, when thrown naturally, in
the same manner by someone else will make that same turn from anywhere
between 11 and 13 feet. YOU WILL HAVE TO FIND YOUR OWN RANGE FOR
THE KNIFE YOU ARE USING.
In knife throwing, there is little possibility that you will cut
yourself if you are using the proper grip. It is advisable in this
technique to have a knife with a smooth handle. If a bayonet is
thrown in this manner, many complications can be avoided by holding
the handle FLAT in the hand, with the small knob to the LEFT, the
edge to the LEFT. The grip is the same, thumb on top. When thrown,
the flat sides of the handle will slip along the fingers.
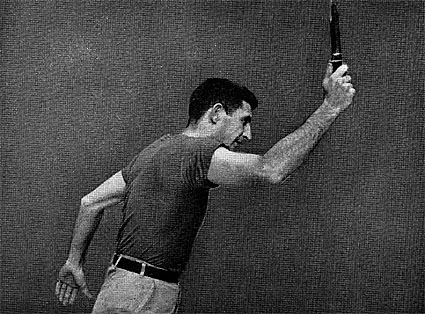
Your natural overhand throw propels the blade to the target. Release
the knife without a wrist snap for accurate results
If you are unable to achieve consistent results, look to vour basic
swing as well as to the wrist. The swing should be a full overhand
throw with fellow-through.
IN THE PRACTICE OF ANY OF THESE TECHNIQUES, safety precautions must
be taken. A bad throw means a ricocheting blade - and ricocheting
blades are treacherous. Knife throwing can be a lot of fun, but
it can be a very dangerous pastime.
The "point first" knife throwing frontiersmen and gold
rush gamblers are gone these many years, but the old Palace Theater
has openedifd its doors again to big time vaudeville; maybe the
forgotten art of "end-over-end" knife throwing behind
the footlights will have a rebirth. Then, too, there's always television...
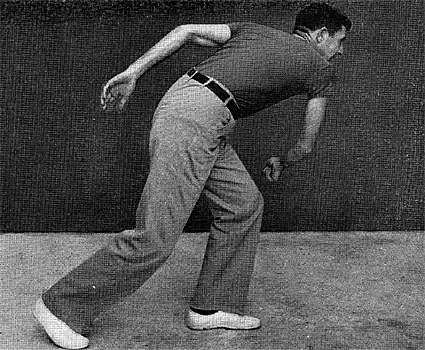
Complete your throw with a full and natural fellow-through. When
you have found correct range, concentrate on accuracy
|